Jekyll2023-07-27T03:31:39+00:00https://quoccuonglqd.github.io//quoccuonguit/feed.xmlQuoc Cuong’s Log BookBlog hệ thống các kiến thức về ML, AI.Nguyễn Quốc CườngPaper Review: “LLaMA: Open and Efficient Foundation Language Models”2023-02-28T00:00:00+00:002023-02-28T00:00:00+00:00https://quoccuonglqd.github.io//quoccuonguit/blogs/Paper%20Review%20LLaMA%20Open%20and%20Efficient%20Foundation%20Language%20Models<p>These days of early 2023, ChatGPT has marked a watershed moment in the history of artificial intelligence, gained widespread popularity and acceptance around the world, thanks to its ability to understand and generate human-like responses to a wide range of prompts. More and more of research attention were put on GPT3 - the underlying architecture that is the driving force behind ChatGPT.</p>
<p>However, just when we thought GPT-3 was the pinnacle of language modeling, a new game-changing model has arrived on the scene. Facebook has recently released a new language model named LLama that has reportedly outperformed GPT-3 in several language benchmarks.</p>
<h1 id="1-key-concepts">1/ Key concepts:</h1>
<p>LLaMA is the name of a series of language models, ranging from 7B to 65B parameters.</p>
<p>Train smaller models on larger dataset than what is typically used. Used only publicy available data.</p>
<p>The authors claim that LLaMA-13B outperforms GPT-3 on most benchmarks despite being 10x smaller. Furthermore, the 65B-parameter model is said to be competitive with the best large language models such as Chinchilla or PaLM-540B.</p>
<h1 id="2-training-data">2/ Training data:</h1>
<p>In many machine learning challenges, especially those related to computer vision, access to high-quality and diverse datasets can be a key factor in achieving high performance. If you are a follower of the challenges that do not restrict the use of dataset like “Google Universal Image Embedding” or “ImageNet Large Scale Visual Recognition Challenge”, you could see teams that are able to gather and effectively use external data sources can often gain an advantage over teams that rely solely on the provided datasets.</p>
<p>The authors of this work have taken an interesting approach to training their language models. Rather than relying on proprietary or inaccessible datasets, they have trained their models exclusively on publicly available datasets.This approach could have significant implications for the field of language modeling. By relying on publicly available datasets, researchers and developers may be able to train powerful language models without the need for expensive proprietary datasets.</p>
<p>The main effort of the authors was creating large-scale language dataset relied on publicly available datasets:</p>
<ul>
<li>
<p>English CommonCrawl [67%]: This is a large corpus of web pages that are crawled and made available to the public for research purposes. The author preprocess five CommonCrawl dumps using the CCNet pipeline which includes deduplicating at the line level, performing language identification to remove non-English pages, filtering low quality content with an n-gram language model and a linear classification model.</p>
</li>
<li>
<p>C4 [15%]: Using the same preprocess pipeline like above, except using heuristic methods such as presence of punctuation marks or the number of words and sentences in a webpage.</p>
</li>
<li>
<p>Github [4.5%]: They kept only projects that are distributed under the Apache, BSD and MIT licenses and filtered with some heuristics like the line the length or proportion of alphanumeric characters.</p>
</li>
<li>
<p>Wikipedia [4.5%]: They added posts from the June-August 2022 period.</p>
</li>
<li>
<p>Gutenberg and Books3 [4.5%]: The authors of the LLaMA paper included two book corpora in their training dataset: the Gutenberg Project and the Books3 section of ThePile. The Gutenberg Project contains books that are in the public domain, while ThePile is a publicly available dataset that was created specifically for training large language models.</p>
</li>
<li>
<p>ArXiv [2.5%]: The authors removed everything before the first section of each paper, as well as the bibliography at the end. They also removed any comments that were included in the LaTeX source files, as well as any inline-expanded definitions and macros written by the authors of the papers.</p>
</li>
</ul>
<p><img src="../assets/images/LLaMa/Zeroshot on Common sense reasoning.PNG" width="600" /></p>
<p><strong>Figure 1</strong> Zero-shot performance on <strong>Common Sense Reasoning</strong> tasks.</p>
<ul>
<li>Stack Exchange [2%]: This is a popular website that hosts a large collection of high-quality questions and answers. The authors kept the data from the 28 largest websites, removed the HTML tags from the text, and sorted the answers by score, from highest to lowest.</li>
</ul>
<p>They used Byte Pair Encoding (BPE) for tokenizing the texts. The algorithm works by iteratively merging the most frequent pairs of adjacent symbols (in this case, characters or character sequences) until a desired vocabulary size is reached.</p>
<h1 id="3-architecture-training-procedure">3/ Architecture, training procedure:</h1>
<ul>
<li>
<p>The LLaMA architecture leverages various improvements that were subsequently proposed and used in different models such as GPT-3(Pre-normalization), PaLM(SwiGLU activation function), and GPT-Neo(Rotary Embeddings).</p>
</li>
<li>
<p>They also optimized the models with AdamW and cosine learning rate schedule.</p>
</li>
<li>
<p>The authors make use of an efficient implementation of the causal multi-head attention to reduce memory usage and runtime by not storing the attention weights and not computing the key/query scores that are masked due to the causal nature of the language modeling task. This is avalable in the xformers library.</p>
</li>
<li>
<p>Checkpointing technique is also used to reduce memory consumption. In checkpointing, intermediate activations of a network are saved periodically and only recomputed when necessary during the backward pass, instead of being stored in memory for the entire duration of training.</p>
</li>
</ul>
<p><img src="../assets/images/LLaMa/NaturalQuestions.PNG" width="600" /></p>
<p><strong>Figure 2</strong> <strong>NaturalQuestions</strong>. Exact match performance.</p>
<h1 id="4-experimental-results">4/ Experimental results:</h1>
<p>These models have been evaluated using 2 commonly used methods: Zero-shot and few-shot tasks. Sometimes in other models, we can observe the use of other evaluation method like fine-tuning on a specific task, cross-validation, and measuring the perplexity of a model on a held-out dataset.</p>
<p>In the context of language model:</p>
<ul>
<li>
<p>Zero-shot tasks are tasks that the model has never been explicitly trained on, but it is expected to be able to perform well based on its general language understanding. The models were given a textual description of a task, providing the model with an understanding of what kind of task it needs to perform. The description typically includes a prompt that specifies what information is required to complete the task, as well as any constraints or specifications on the expected output. The model is expected to provide an answer using open-ended generation or rank the proposed answers without any fine-tuning on the specific task.</p>
</li>
<li>
<p>In few-shot tasks, the model is given a small number of examples (usually between 1 and 64) of the task, and a test example. The model takes these examples as input and generates the answer or ranks different options.</p>
</li>
</ul>
<p>The LAMA model was evaluated on a variety of benchmarks, including Common Sense Reasoning, Closed-book Question Answering, Reading Comprehension, Mathematical Reasoning, Code Generation, and Massive Multitask Language Understanding.</p>
<h1 id="5-discussion">5/ Discussion:</h1>
<p>Here we have some observations and insights of the authors:</p>
<ul>
<li>
<p>Finetuning these models on instructions
lead to promising results.</p>
</li>
<li>
<p>In their experiments, the authors observe that toxicity scores increase with larger model sizes within the same model family.</p>
</li>
<li>
<p>The model captured societal biases related to gender and occupation.</p>
</li>
</ul>
<h1 id="conclusion">Conclusion</h1>
<p>Our brief paper review is ended here. We hope it can give you useful information and comprehensive understanding of this paper. So, let’s continue exploring these breakthrough techniques and to remain dedicated to responsible and ethical research.</p>Nguyễn Quốc CườngDesign Space Of A Convolution Neural Network2023-02-08T00:00:00+00:002023-02-08T00:00:00+00:00https://quoccuonglqd.github.io//quoccuonguit/blogs/CNN%20Design%20Space<h1 id="introduction">Introduction:</h1>
<p>Convolutional Neural Networks (CNNs) have revolutionized the world of computer vision and deep learning, allowing us to solve complex tasks with remarkable accuracy. From identifying objects in images to recognizing speech, CNNs have become an indispensable tool for data scientists and researchers. However, despite their widespread use, the design space of CNNs is often shrouded in mystery and considered to be a black box by many. In this blog, we aim to demystify this design space and shed light on the common elements that make up a typical CNN. Join us on this journey as we delve into the inner workings of CNNs and explore the underlying principles that make them so powerful.</p>
<h1 id="design-pattern">Design Pattern</h1>
<p>The common design pattern for Convolutional Neural Networks (CNNs) are divided into three main components: the stem, the body, and the head.</p>
<p>The stem performs initial image processing and often uses convolutions with a larger window size. The body is made up of multiple blocks and carries out the majority of transformations needed to turn raw images into object representations. The head then converts these representations into the desired outputs, such as via a softmax regressor for multiclass classification.</p>
<p>The stem’s initial image processing is crucial for reducing noise and removing irrelevant information from the input data. The body’s multiple blocks and stages are responsible for extracting features and transforming the data into a useful representation. The head’s output prediction is based on the features extracted by the body and must be optimized for the specific task being performed.</p>
<p>The body is further divided into multiple stages, which operate on the image at decreasing resolutions. Both the stem and each subsequent stage quarter the spatial resolution of the image. Each stage consists of one or more blocks.</p>
<p><img src="../assets/images/CNN/AnyNet-transformed.png" width="600" /></p>
<p><strong>Figure 1</strong> The CNN design space. The numbers (c, r) along each arrow indicate the number of channels c and the resolution r × r of the images at that point. From left to right: generic network structure composed of stem, body, and head; body composed of four stages; detailed structure of a stage</p>
<p>Let’s take a look at Figure 1. The stem part takes as input the RGB image which has 3 channel and transform them into a feature maps with $c_0$ channels. It also halves the resolution $r\times r$ to $r/2\times r/2$. There are 2 common ways to halve the resolution of a feature map in a Convolutional Neural Network (CNN) and we can see the difference between different implementations. The first one is using pooling layer; it works by down-sampling the feature maps by taking the maximum or average value of the pixels within a set window size. Another way to reduce the resolution of feature maps is through the use of convolution layers with a stride of 2. This method applies the convolution operation to every other pixel in the feature map, effectively reducing the spatial dimension by half. This method has the advantage of retaining more information compared to pooling layers, as it doesn’t perform any lossy operations.</p>
<p><img src="../assets/images/CNN/AnyNet Explaination on resnet.jpg" width="600" /></p>
<p><strong>Figure 2</strong> Common CNN design space visualized on Resnet. The stem part consists of 2 convolution layer. The body contains 4 stages which have 3,4,6,3 blocks, respectively. The head is a fully connected layer.</p>
<p>Assumed our image is compatible with ImageNet images of shape $224\times224$, the body part of the CNN serves to decrease the spatial dimensions of the image to $7\times7\times c_4$ through four stages. Each stage has a stride of 2, which means that it reduces the spatial resolution by half. As a result, the resolution of the image is reduced from $224\times224$ to $7\times7$ over the course of these four stages. This is achieved by dividing the initial size by 2 five times, resulting in the final size of $224/2^{5} = 7$.</p>
<p>Each stage in the body of a Convolutional Neural Network (CNN) is composed of multiple blocks. These blocks can have the same number of channels, as seen in the VGG network. Alternatively, the number of channels in the middle block of a stage can be smaller, resulting in a bottleneck structure. This design choice allows for more efficient computation while maintaining a similar level of performance. Another option is to have the middle block of a stage have a higher number of channels, referred to as an inverted bottleneck structure. It should be mentioned that, regardless of the structure chosen for the blocks within a stage, the first and last blocks in each stage always have the same number of channels.</p>
<p>The last component - the head of the network - adopts a standard design, utilizing global average pooling to condense the feature maps into a compact representation. This is then followed by a fully connected layer, which outputs an n-dimensional vector.</p>
<p>When manually designing a custom CNN architecture, various hyperparameters must be selected. One of the most crucial decisions is the type of blocks to be used in each stage. There are a variety of pre-existing blocks to choose from, such as VGG blocks, Inception blocks, or ResNet blocks. Alternatively, one may choose to design a custom block manually. Another option is to use Neural Architecture Search (NAS), though this will not be discussed in detail here.</p>
<p>In case of using bottleneck layer or inverted bottleneck layer, we will need to choose the bottleneck ratio. It refers to the ratio of the number of channels in a bottleneck layer within a convolutional block compared to the number of channels in the input and output of the block. As such, with bottleneck ratio $k_i$ ≥ 1 we afford some number of channels $c_i/k_i$ within each middle block for stage $i$. Additionally, some blocks such as ResNeXt and MobileNet’s blocks can use group convolution, where the input channels are divided into multiple groups and each group is convolved independently with its own set of filters. In that case, we also need to choose their group width.</p>
<p>For short, we will consider the type of CNN block, the number of stages $m$, the number of blocks in each stage $d_1$,$d_2$,…,$d_m$, the channels of each stage $c_1$,$c_2$,…,$c_m$, the bottleneck ratios $k_1$,$k_2$,…,$k_m$ as well as the group width $g_1$,$g_2$,…,$g_m$.</p>
<h1 id="implementation">Implementation:</h1>
<p>This section provides the implementation of AnyNet - the template for this kind of CNN design space. The first thing to do is defining our architecture’s hyperparameter with a dictionary <code class="language-plaintext highlighter-rouge">params</code>. The specific hyperparameters chosen here correspond to a CNN with a bottleneck block type, 4 stages, 2 blocks per stage in the first and last stages and 4 blocks per stage in the intermediate stages, with channel sizes ranging from 32 to 512, a bottleneck ratio of 4, and a group width of 32.</p>
<div class="language-python highlighter-rouge"><div class="highlight"><pre class="highlight"><code><span class="kn">import</span> <span class="nn">os</span>
<span class="kn">import</span> <span class="nn">torch</span>
<span class="kn">import</span> <span class="nn">torch.nn</span> <span class="k">as</span> <span class="n">nn</span>
<span class="kn">import</span> <span class="nn">torch.nn.functional</span> <span class="k">as</span> <span class="n">F</span>
<span class="kn">import</span> <span class="nn">torch.optim</span> <span class="k">as</span> <span class="n">optim</span>
<span class="kn">from</span> <span class="nn">torch.utils.data</span> <span class="kn">import</span> <span class="n">DataLoader</span><span class="p">,</span> <span class="n">random_split</span>
<span class="kn">import</span> <span class="nn">pytorch_lightning</span> <span class="k">as</span> <span class="n">pl</span>
<span class="kn">from</span> <span class="nn">pytorch_lightning.callbacks</span> <span class="kn">import</span> <span class="n">LearningRateMonitor</span><span class="p">,</span> <span class="n">ModelCheckpoint</span>
<span class="kn">from</span> <span class="nn">torchvision</span> <span class="kn">import</span> <span class="n">transforms</span>
<span class="kn">from</span> <span class="nn">torchvision.datasets</span> <span class="kn">import</span> <span class="n">CIFAR10</span>
<span class="n">params</span> <span class="o">=</span> <span class="p">{</span>
<span class="s">'block_type'</span><span class="p">:</span> <span class="s">'bottleneck'</span><span class="p">,</span> <span class="c1"># 'bottleneck', 'vgg', 'inception'
</span> <span class="s">'num_stages'</span><span class="p">:</span> <span class="mi">4</span><span class="p">,</span>
<span class="s">'num_blocks_per_stage'</span><span class="p">:</span> <span class="p">[</span><span class="mi">2</span><span class="p">,</span> <span class="mi">4</span><span class="p">,</span> <span class="mi">4</span><span class="p">,</span> <span class="mi">2</span><span class="p">],</span>
<span class="s">'num_channels'</span><span class="p">:</span> <span class="p">[</span><span class="mi">32</span><span class="p">,</span> <span class="mi">64</span><span class="p">,</span> <span class="mi">128</span><span class="p">,</span> <span class="mi">256</span><span class="p">,</span> <span class="mi">512</span><span class="p">],</span>
<span class="s">'bottleneck_ratio'</span><span class="p">:</span> <span class="mi">4</span><span class="p">,</span>
<span class="s">'group_width'</span><span class="p">:</span> <span class="mi">32</span>
<span class="p">}</span>
</code></pre></div></div>
<p>We also define 3 types of convolutional block, namely ResNet BottleNeck, VGG and Inception. For BottleNeck block, the convolutional layers are applied on the input x in the order conv1 -> bn1 -> relu -> conv2 -> bn2 -> relu -> conv3 -> bn3. The shortcut connection is added to the output of this sequence of layers, and the resulting tensor is passed through a final ReLU activation. The shortcut consists of a sequence of 1x1 convolutions and batch normalization layers.</p>
<p>VGG consists of a convolutional layer followed by a batch normalization layer and a ReLU activation function. Optionally, it can also have a max pooling layer with a kernel size of 2 and a stride of 2. The pooling layer downsamples the input tensor by a factor of 2 in both spatial dimensions.</p>
<p>Inception block applies four different convolutional operations with different kernel sizes (1x1, 3x3, 5x5) as well as a pooling operation. The outputs of these operations are concatenated along the channel dimension and returned as the output of the block.</p>
<div class="language-python highlighter-rouge"><div class="highlight"><pre class="highlight"><code><span class="k">class</span> <span class="nc">Bottleneck</span><span class="p">(</span><span class="n">nn</span><span class="p">.</span><span class="n">Module</span><span class="p">):</span>
<span class="k">def</span> <span class="nf">__init__</span><span class="p">(</span><span class="bp">self</span><span class="p">,</span> <span class="n">in_planes</span><span class="p">,</span> <span class="n">planes</span><span class="p">,</span> <span class="n">expansion</span><span class="p">,</span> <span class="n">group_width</span><span class="p">,</span> <span class="n">stride</span><span class="o">=</span><span class="mi">1</span><span class="p">):</span>
<span class="nb">super</span><span class="p">(</span><span class="n">Bottleneck</span><span class="p">,</span> <span class="bp">self</span><span class="p">).</span><span class="n">__init__</span><span class="p">()</span>
<span class="bp">self</span><span class="p">.</span><span class="n">expansion</span> <span class="o">=</span> <span class="n">expansion</span>
<span class="bp">self</span><span class="p">.</span><span class="n">group_width</span> <span class="o">=</span> <span class="n">group_width</span>
<span class="bp">self</span><span class="p">.</span><span class="n">conv1</span> <span class="o">=</span> <span class="n">nn</span><span class="p">.</span><span class="n">Conv2d</span><span class="p">(</span><span class="n">in_planes</span><span class="p">,</span> <span class="n">planes</span><span class="p">,</span> <span class="n">kernel_size</span><span class="o">=</span><span class="mi">1</span><span class="p">,</span> <span class="n">bias</span><span class="o">=</span><span class="bp">False</span><span class="p">,</span> <span class="n">groups</span><span class="o">=</span><span class="bp">self</span><span class="p">.</span><span class="n">group_width</span><span class="p">)</span>
<span class="bp">self</span><span class="p">.</span><span class="n">bn1</span> <span class="o">=</span> <span class="n">nn</span><span class="p">.</span><span class="n">BatchNorm2d</span><span class="p">(</span><span class="n">planes</span><span class="p">)</span>
<span class="bp">self</span><span class="p">.</span><span class="n">conv2</span> <span class="o">=</span> <span class="n">nn</span><span class="p">.</span><span class="n">Conv2d</span><span class="p">(</span><span class="n">planes</span><span class="p">,</span> <span class="bp">self</span><span class="p">.</span><span class="n">expansion</span> <span class="o">*</span> <span class="n">planes</span><span class="p">,</span> <span class="n">kernel_size</span><span class="o">=</span><span class="mi">3</span><span class="p">,</span> <span class="n">stride</span><span class="o">=</span><span class="n">stride</span><span class="p">,</span> <span class="n">padding</span><span class="o">=</span><span class="mi">1</span><span class="p">,</span> <span class="n">bias</span><span class="o">=</span><span class="bp">False</span><span class="p">,</span> <span class="n">groups</span><span class="o">=</span><span class="bp">self</span><span class="p">.</span><span class="n">group_width</span><span class="p">)</span>
<span class="bp">self</span><span class="p">.</span><span class="n">bn2</span> <span class="o">=</span> <span class="n">nn</span><span class="p">.</span><span class="n">BatchNorm2d</span><span class="p">(</span><span class="bp">self</span><span class="p">.</span><span class="n">expansion</span> <span class="o">*</span> <span class="n">planes</span><span class="p">)</span>
<span class="bp">self</span><span class="p">.</span><span class="n">conv3</span> <span class="o">=</span> <span class="n">nn</span><span class="p">.</span><span class="n">Conv2d</span><span class="p">(</span><span class="bp">self</span><span class="p">.</span><span class="n">expansion</span> <span class="o">*</span> <span class="n">planes</span><span class="p">,</span> <span class="n">planes</span><span class="p">,</span> <span class="n">kernel_size</span><span class="o">=</span><span class="mi">1</span><span class="p">,</span> <span class="n">bias</span><span class="o">=</span><span class="bp">False</span><span class="p">,</span> <span class="n">groups</span><span class="o">=</span><span class="bp">self</span><span class="p">.</span><span class="n">group_width</span><span class="p">)</span>
<span class="bp">self</span><span class="p">.</span><span class="n">bn3</span> <span class="o">=</span> <span class="n">nn</span><span class="p">.</span><span class="n">BatchNorm2d</span><span class="p">(</span><span class="n">planes</span><span class="p">)</span>
<span class="bp">self</span><span class="p">.</span><span class="n">shortcut</span> <span class="o">=</span> <span class="n">nn</span><span class="p">.</span><span class="n">Sequential</span><span class="p">()</span>
<span class="k">if</span> <span class="n">stride</span> <span class="o">!=</span> <span class="mi">1</span> <span class="ow">or</span> <span class="n">in_planes</span> <span class="o">!=</span> <span class="n">planes</span><span class="p">:</span>
<span class="bp">self</span><span class="p">.</span><span class="n">shortcut</span> <span class="o">=</span> <span class="n">nn</span><span class="p">.</span><span class="n">Sequential</span><span class="p">(</span>
<span class="n">nn</span><span class="p">.</span><span class="n">Conv2d</span><span class="p">(</span><span class="n">in_planes</span><span class="p">,</span> <span class="n">planes</span><span class="p">,</span> <span class="n">kernel_size</span><span class="o">=</span><span class="mi">1</span><span class="p">,</span> <span class="n">stride</span><span class="o">=</span><span class="n">stride</span><span class="p">,</span> <span class="n">bias</span><span class="o">=</span><span class="bp">False</span><span class="p">),</span>
<span class="n">nn</span><span class="p">.</span><span class="n">BatchNorm2d</span><span class="p">(</span><span class="n">planes</span><span class="p">)</span>
<span class="p">)</span>
<span class="k">def</span> <span class="nf">forward</span><span class="p">(</span><span class="bp">self</span><span class="p">,</span> <span class="n">x</span><span class="p">):</span>
<span class="n">out</span> <span class="o">=</span> <span class="n">F</span><span class="p">.</span><span class="n">relu</span><span class="p">(</span><span class="bp">self</span><span class="p">.</span><span class="n">bn1</span><span class="p">(</span><span class="bp">self</span><span class="p">.</span><span class="n">conv1</span><span class="p">(</span><span class="n">x</span><span class="p">)))</span>
<span class="n">out</span> <span class="o">=</span> <span class="n">F</span><span class="p">.</span><span class="n">relu</span><span class="p">(</span><span class="bp">self</span><span class="p">.</span><span class="n">bn2</span><span class="p">(</span><span class="bp">self</span><span class="p">.</span><span class="n">conv2</span><span class="p">(</span><span class="n">out</span><span class="p">)))</span>
<span class="n">out</span> <span class="o">=</span> <span class="bp">self</span><span class="p">.</span><span class="n">bn3</span><span class="p">(</span><span class="bp">self</span><span class="p">.</span><span class="n">conv3</span><span class="p">(</span><span class="n">out</span><span class="p">))</span>
<span class="n">out</span> <span class="o">+=</span> <span class="bp">self</span><span class="p">.</span><span class="n">shortcut</span><span class="p">(</span><span class="n">x</span><span class="p">)</span>
<span class="n">out</span> <span class="o">=</span> <span class="n">F</span><span class="p">.</span><span class="n">relu</span><span class="p">(</span><span class="n">out</span><span class="p">)</span>
<span class="k">return</span> <span class="n">out</span>
<span class="k">class</span> <span class="nc">VGGBlock</span><span class="p">(</span><span class="n">nn</span><span class="p">.</span><span class="n">Module</span><span class="p">):</span>
<span class="k">def</span> <span class="nf">__init__</span><span class="p">(</span><span class="bp">self</span><span class="p">,</span> <span class="n">in_channels</span><span class="p">,</span> <span class="n">out_channels</span><span class="p">,</span> <span class="n">kernel_size</span><span class="o">=</span><span class="mi">3</span><span class="p">,</span> <span class="n">padding</span><span class="o">=</span><span class="mi">1</span><span class="p">,</span> <span class="n">pooling</span><span class="o">=</span><span class="bp">False</span><span class="p">):</span>
<span class="nb">super</span><span class="p">(</span><span class="n">VGGBlock</span><span class="p">,</span> <span class="bp">self</span><span class="p">).</span><span class="n">__init__</span><span class="p">()</span>
<span class="bp">self</span><span class="p">.</span><span class="n">conv</span> <span class="o">=</span> <span class="n">nn</span><span class="p">.</span><span class="n">Conv2d</span><span class="p">(</span><span class="n">in_channels</span><span class="p">,</span> <span class="n">out_channels</span><span class="p">,</span> <span class="n">kernel_size</span><span class="p">,</span> <span class="n">padding</span><span class="o">=</span><span class="n">padding</span><span class="p">)</span>
<span class="bp">self</span><span class="p">.</span><span class="n">bn</span> <span class="o">=</span> <span class="n">nn</span><span class="p">.</span><span class="n">BatchNorm2d</span><span class="p">(</span><span class="n">out_channels</span><span class="p">)</span>
<span class="bp">self</span><span class="p">.</span><span class="n">relu</span> <span class="o">=</span> <span class="n">nn</span><span class="p">.</span><span class="n">ReLU</span><span class="p">(</span><span class="n">inplace</span><span class="o">=</span><span class="bp">True</span><span class="p">)</span>
<span class="bp">self</span><span class="p">.</span><span class="n">pooling</span> <span class="o">=</span> <span class="n">pooling</span>
<span class="k">if</span> <span class="bp">self</span><span class="p">.</span><span class="n">pooling</span><span class="p">:</span>
<span class="bp">self</span><span class="p">.</span><span class="n">pool</span> <span class="o">=</span> <span class="n">nn</span><span class="p">.</span><span class="n">MaxPool2d</span><span class="p">(</span><span class="n">kernel_size</span><span class="o">=</span><span class="mi">2</span><span class="p">,</span> <span class="n">stride</span><span class="o">=</span><span class="mi">2</span><span class="p">)</span>
<span class="k">def</span> <span class="nf">forward</span><span class="p">(</span><span class="bp">self</span><span class="p">,</span> <span class="n">x</span><span class="p">):</span>
<span class="n">x</span> <span class="o">=</span> <span class="bp">self</span><span class="p">.</span><span class="n">conv</span><span class="p">(</span><span class="n">x</span><span class="p">)</span>
<span class="n">x</span> <span class="o">=</span> <span class="bp">self</span><span class="p">.</span><span class="n">bn</span><span class="p">(</span><span class="n">x</span><span class="p">)</span>
<span class="n">x</span> <span class="o">=</span> <span class="bp">self</span><span class="p">.</span><span class="n">relu</span><span class="p">(</span><span class="n">x</span><span class="p">)</span>
<span class="k">if</span> <span class="bp">self</span><span class="p">.</span><span class="n">pooling</span><span class="p">:</span>
<span class="n">x</span> <span class="o">=</span> <span class="bp">self</span><span class="p">.</span><span class="n">pool</span><span class="p">(</span><span class="n">x</span><span class="p">)</span>
<span class="k">return</span> <span class="n">x</span>
<span class="k">class</span> <span class="nc">InceptionBlock</span><span class="p">(</span><span class="n">nn</span><span class="p">.</span><span class="n">Module</span><span class="p">):</span>
<span class="k">def</span> <span class="nf">__init__</span><span class="p">(</span><span class="bp">self</span><span class="p">,</span> <span class="n">in_channels</span><span class="p">,</span> <span class="n">out_channels_1x1</span><span class="p">,</span> <span class="n">out_channels_3x3_reduce</span><span class="p">,</span> <span class="n">out_channels_3x3</span><span class="p">,</span> <span class="n">out_channels_5x5_reduce</span><span class="p">,</span> <span class="n">out_channels_5x5</span><span class="p">,</span> <span class="n">out_channels_pool_proj</span><span class="p">):</span>
<span class="nb">super</span><span class="p">(</span><span class="n">InceptionBlock</span><span class="p">,</span> <span class="bp">self</span><span class="p">).</span><span class="n">__init__</span><span class="p">()</span>
<span class="bp">self</span><span class="p">.</span><span class="n">branch_1x1</span> <span class="o">=</span> <span class="n">nn</span><span class="p">.</span><span class="n">Sequential</span><span class="p">(</span>
<span class="n">nn</span><span class="p">.</span><span class="n">Conv2d</span><span class="p">(</span><span class="n">in_channels</span><span class="p">,</span> <span class="n">out_channels_1x1</span><span class="p">,</span> <span class="n">kernel_size</span><span class="o">=</span><span class="mi">1</span><span class="p">),</span>
<span class="n">nn</span><span class="p">.</span><span class="n">BatchNorm2d</span><span class="p">(</span><span class="n">out_channels_1x1</span><span class="p">),</span>
<span class="n">nn</span><span class="p">.</span><span class="n">ReLU</span><span class="p">(</span><span class="n">inplace</span><span class="o">=</span><span class="bp">True</span><span class="p">)</span>
<span class="p">)</span>
<span class="bp">self</span><span class="p">.</span><span class="n">branch_3x3</span> <span class="o">=</span> <span class="n">nn</span><span class="p">.</span><span class="n">Sequential</span><span class="p">(</span>
<span class="n">nn</span><span class="p">.</span><span class="n">Conv2d</span><span class="p">(</span><span class="n">in_channels</span><span class="p">,</span> <span class="n">out_channels_3x3_reduce</span><span class="p">,</span> <span class="n">kernel_size</span><span class="o">=</span><span class="mi">1</span><span class="p">),</span>
<span class="n">nn</span><span class="p">.</span><span class="n">BatchNorm2d</span><span class="p">(</span><span class="n">out_channels_3x3_reduce</span><span class="p">),</span>
<span class="n">nn</span><span class="p">.</span><span class="n">ReLU</span><span class="p">(</span><span class="n">inplace</span><span class="o">=</span><span class="bp">True</span><span class="p">),</span>
<span class="n">nn</span><span class="p">.</span><span class="n">Conv2d</span><span class="p">(</span><span class="n">out_channels_3x3_reduce</span><span class="p">,</span> <span class="n">out_channels_3x3</span><span class="p">,</span> <span class="n">kernel_size</span><span class="o">=</span><span class="mi">3</span><span class="p">,</span> <span class="n">padding</span><span class="o">=</span><span class="mi">1</span><span class="p">),</span>
<span class="n">nn</span><span class="p">.</span><span class="n">BatchNorm2d</span><span class="p">(</span><span class="n">out_channels_3x3</span><span class="p">),</span>
<span class="n">nn</span><span class="p">.</span><span class="n">ReLU</span><span class="p">(</span><span class="n">inplace</span><span class="o">=</span><span class="bp">True</span><span class="p">)</span>
<span class="p">)</span>
<span class="bp">self</span><span class="p">.</span><span class="n">branch_5x5</span> <span class="o">=</span> <span class="n">nn</span><span class="p">.</span><span class="n">Sequential</span><span class="p">(</span>
<span class="n">nn</span><span class="p">.</span><span class="n">Conv2d</span><span class="p">(</span><span class="n">in_channels</span><span class="p">,</span> <span class="n">out_channels_5x5_reduce</span><span class="p">,</span> <span class="n">kernel_size</span><span class="o">=</span><span class="mi">1</span><span class="p">),</span>
<span class="n">nn</span><span class="p">.</span><span class="n">BatchNorm2d</span><span class="p">(</span><span class="n">out_channels_5x5_reduce</span><span class="p">),</span>
<span class="n">nn</span><span class="p">.</span><span class="n">ReLU</span><span class="p">(</span><span class="n">inplace</span><span class="o">=</span><span class="bp">True</span><span class="p">),</span>
<span class="n">nn</span><span class="p">.</span><span class="n">Conv2d</span><span class="p">(</span><span class="n">out_channels_5x5_reduce</span><span class="p">,</span> <span class="n">out_channels_5x5</span><span class="p">,</span> <span class="n">kernel_size</span><span class="o">=</span><span class="mi">5</span><span class="p">,</span> <span class="n">padding</span><span class="o">=</span><span class="mi">2</span><span class="p">),</span>
<span class="n">nn</span><span class="p">.</span><span class="n">BatchNorm2d</span><span class="p">(</span><span class="n">out_channels_5x5</span><span class="p">),</span>
<span class="n">nn</span><span class="p">.</span><span class="n">ReLU</span><span class="p">(</span><span class="n">inplace</span><span class="o">=</span><span class="bp">True</span><span class="p">)</span>
<span class="p">)</span>
<span class="bp">self</span><span class="p">.</span><span class="n">branch_pool</span> <span class="o">=</span> <span class="n">nn</span><span class="p">.</span><span class="n">Sequential</span><span class="p">(</span>
<span class="n">nn</span><span class="p">.</span><span class="n">MaxPool2d</span><span class="p">(</span><span class="n">kernel_size</span><span class="o">=</span><span class="mi">3</span><span class="p">,</span> <span class="n">stride</span><span class="o">=</span><span class="mi">1</span><span class="p">,</span> <span class="n">padding</span><span class="o">=</span><span class="mi">1</span><span class="p">),</span>
<span class="n">nn</span><span class="p">.</span><span class="n">Conv2d</span><span class="p">(</span><span class="n">in_channels</span><span class="p">,</span> <span class="n">out_channels_pool_proj</span><span class="p">,</span> <span class="n">kernel_size</span><span class="o">=</span><span class="mi">1</span><span class="p">),</span>
<span class="n">nn</span><span class="p">.</span><span class="n">BatchNorm2d</span><span class="p">(</span><span class="n">out_channels_pool_proj</span><span class="p">),</span>
<span class="n">nn</span><span class="p">.</span><span class="n">ReLU</span><span class="p">(</span><span class="n">inplace</span><span class="o">=</span><span class="bp">True</span><span class="p">)</span>
<span class="p">)</span>
<span class="k">def</span> <span class="nf">forward</span><span class="p">(</span><span class="bp">self</span><span class="p">,</span> <span class="n">x</span><span class="p">):</span>
<span class="n">x1</span> <span class="o">=</span> <span class="bp">self</span><span class="p">.</span><span class="n">branch_1x1</span><span class="p">(</span><span class="n">x</span><span class="p">)</span>
<span class="n">x2</span> <span class="o">=</span> <span class="bp">self</span><span class="p">.</span><span class="n">branch_3x3</span><span class="p">(</span><span class="n">x</span><span class="p">)</span>
<span class="n">x3</span> <span class="o">=</span> <span class="bp">self</span><span class="p">.</span><span class="n">branch_5x5</span><span class="p">(</span><span class="n">x</span><span class="p">)</span>
<span class="n">x4</span> <span class="o">=</span> <span class="bp">self</span><span class="p">.</span><span class="n">branch_pool</span><span class="p">(</span><span class="n">x</span><span class="p">)</span>
<span class="k">return</span> <span class="n">torch</span><span class="p">.</span><span class="n">cat</span><span class="p">([</span><span class="n">x1</span><span class="p">,</span> <span class="n">x2</span><span class="p">,</span> <span class="n">x3</span><span class="p">,</span> <span class="n">x4</span><span class="p">],</span> <span class="n">dim</span><span class="o">=</span><span class="mi">1</span><span class="p">)</span>
</code></pre></div></div>
<p>Next, we wrap them up into an AnyNet module. It includes a stem block, four stages of feature extraction blocks, and a head block for classification. The specific blocks used in each stage can be specified by the user, including options for bottleneck blocks, VGG-style blocks, and inception blocks. In this implementation, we provide a classification module and test its capacity on the well-known CIFAR10 dataset. However, everyone can easily adapt another head part to use it on other vision tasks.</p>
<div class="language-python highlighter-rouge"><div class="highlight"><pre class="highlight"><code><span class="k">class</span> <span class="nc">AnyNet</span><span class="p">(</span><span class="n">nn</span><span class="p">.</span><span class="n">Module</span><span class="p">):</span>
<span class="k">def</span> <span class="nf">__init__</span><span class="p">(</span><span class="bp">self</span><span class="p">,</span> <span class="n">params</span><span class="p">):</span>
<span class="nb">super</span><span class="p">(</span><span class="n">AnyNet</span><span class="p">,</span> <span class="bp">self</span><span class="p">).</span><span class="n">__init__</span><span class="p">()</span>
<span class="bp">self</span><span class="p">.</span><span class="n">params</span> <span class="o">=</span> <span class="n">params</span>
<span class="bp">self</span><span class="p">.</span><span class="n">block_type</span> <span class="o">=</span> <span class="n">params</span><span class="p">[</span><span class="s">'block_type'</span><span class="p">]</span>
<span class="bp">self</span><span class="p">.</span><span class="n">num_stages</span> <span class="o">=</span> <span class="n">params</span><span class="p">[</span><span class="s">'num_stages'</span><span class="p">]</span>
<span class="bp">self</span><span class="p">.</span><span class="n">num_blocks_per_stage</span> <span class="o">=</span> <span class="n">params</span><span class="p">[</span><span class="s">'num_blocks_per_stage'</span><span class="p">]</span>
<span class="bp">self</span><span class="p">.</span><span class="n">num_channels</span> <span class="o">=</span> <span class="n">params</span><span class="p">[</span><span class="s">'num_channels'</span><span class="p">]</span>
<span class="bp">self</span><span class="p">.</span><span class="n">bottleneck_ratio</span> <span class="o">=</span> <span class="n">params</span><span class="p">[</span><span class="s">'bottleneck_ratio'</span><span class="p">]</span>
<span class="bp">self</span><span class="p">.</span><span class="n">group_width</span> <span class="o">=</span> <span class="n">params</span><span class="p">[</span><span class="s">'group_width'</span><span class="p">]</span>
<span class="bp">self</span><span class="p">.</span><span class="n">in_planes</span> <span class="o">=</span> <span class="bp">self</span><span class="p">.</span><span class="n">num_channels</span><span class="p">[</span><span class="mi">0</span><span class="p">]</span>
<span class="c1"># self.conv1 = nn.Conv2d(3, self.in_planes, kernel_size=3, stride=1, padding=1, bias=False)
</span> <span class="c1"># self.bn1 = nn.BatchNorm2d(self.in_planes)
</span> <span class="bp">self</span><span class="p">.</span><span class="n">stem</span> <span class="o">=</span> <span class="n">nn</span><span class="p">.</span><span class="n">Sequential</span><span class="p">(</span>
<span class="n">nn</span><span class="p">.</span><span class="n">Conv2d</span><span class="p">(</span><span class="mi">3</span><span class="p">,</span> <span class="bp">self</span><span class="p">.</span><span class="n">in_planes</span><span class="p">,</span> <span class="n">kernel_size</span><span class="o">=</span><span class="mi">3</span><span class="p">,</span> <span class="n">stride</span><span class="o">=</span><span class="mi">1</span><span class="p">,</span> <span class="n">padding</span><span class="o">=</span><span class="mi">1</span><span class="p">,</span> <span class="n">bias</span><span class="o">=</span><span class="bp">False</span><span class="p">),</span>
<span class="n">nn</span><span class="p">.</span><span class="n">BatchNorm2d</span><span class="p">(</span><span class="bp">self</span><span class="p">.</span><span class="n">in_planes</span><span class="p">),</span>
<span class="n">nn</span><span class="p">.</span><span class="n">ReLU</span><span class="p">(</span><span class="n">inplace</span><span class="o">=</span><span class="bp">True</span><span class="p">)</span>
<span class="p">)</span>
<span class="bp">self</span><span class="p">.</span><span class="n">layer1</span> <span class="o">=</span> <span class="bp">self</span><span class="p">.</span><span class="n">_make_layer</span><span class="p">(</span><span class="bp">self</span><span class="p">.</span><span class="n">num_blocks_per_stage</span><span class="p">[</span><span class="mi">0</span><span class="p">],</span> <span class="n">stage_id</span><span class="o">=</span><span class="mi">1</span><span class="p">,</span> <span class="n">expansion</span><span class="o">=</span><span class="n">params</span><span class="p">[</span><span class="s">'bottleneck_ratio'</span><span class="p">],</span> <span class="n">group_width</span><span class="o">=</span><span class="n">params</span><span class="p">[</span><span class="s">'group_width'</span><span class="p">])</span>
<span class="bp">self</span><span class="p">.</span><span class="n">layer2</span> <span class="o">=</span> <span class="bp">self</span><span class="p">.</span><span class="n">_make_layer</span><span class="p">(</span><span class="bp">self</span><span class="p">.</span><span class="n">num_blocks_per_stage</span><span class="p">[</span><span class="mi">1</span><span class="p">],</span> <span class="n">stage_id</span><span class="o">=</span><span class="mi">2</span><span class="p">,</span> <span class="n">expansion</span><span class="o">=</span><span class="n">params</span><span class="p">[</span><span class="s">'bottleneck_ratio'</span><span class="p">],</span> <span class="n">group_width</span><span class="o">=</span><span class="n">params</span><span class="p">[</span><span class="s">'group_width'</span><span class="p">],</span> <span class="n">stride</span><span class="o">=</span><span class="mi">2</span><span class="p">)</span>
<span class="bp">self</span><span class="p">.</span><span class="n">layer3</span> <span class="o">=</span> <span class="bp">self</span><span class="p">.</span><span class="n">_make_layer</span><span class="p">(</span><span class="bp">self</span><span class="p">.</span><span class="n">num_blocks_per_stage</span><span class="p">[</span><span class="mi">2</span><span class="p">],</span> <span class="n">stage_id</span><span class="o">=</span><span class="mi">3</span><span class="p">,</span> <span class="n">expansion</span><span class="o">=</span><span class="n">params</span><span class="p">[</span><span class="s">'bottleneck_ratio'</span><span class="p">],</span> <span class="n">group_width</span><span class="o">=</span><span class="n">params</span><span class="p">[</span><span class="s">'group_width'</span><span class="p">],</span> <span class="n">stride</span><span class="o">=</span><span class="mi">2</span><span class="p">)</span>
<span class="bp">self</span><span class="p">.</span><span class="n">layer4</span> <span class="o">=</span> <span class="bp">self</span><span class="p">.</span><span class="n">_make_layer</span><span class="p">(</span><span class="bp">self</span><span class="p">.</span><span class="n">num_blocks_per_stage</span><span class="p">[</span><span class="mi">3</span><span class="p">],</span> <span class="n">stage_id</span><span class="o">=</span><span class="mi">4</span><span class="p">,</span> <span class="n">expansion</span><span class="o">=</span><span class="n">params</span><span class="p">[</span><span class="s">'bottleneck_ratio'</span><span class="p">],</span> <span class="n">group_width</span><span class="o">=</span><span class="n">params</span><span class="p">[</span><span class="s">'group_width'</span><span class="p">],</span> <span class="n">stride</span><span class="o">=</span><span class="mi">2</span><span class="p">)</span>
<span class="c1"># self.linear = nn.Linear(self.in_planes, 10)
</span> <span class="bp">self</span><span class="p">.</span><span class="n">head</span> <span class="o">=</span> <span class="n">nn</span><span class="p">.</span><span class="n">Sequential</span><span class="p">(</span>
<span class="n">nn</span><span class="p">.</span><span class="n">AdaptiveAvgPool2d</span><span class="p">((</span><span class="mi">1</span><span class="p">,</span> <span class="mi">1</span><span class="p">)),</span>
<span class="n">nn</span><span class="p">.</span><span class="n">Flatten</span><span class="p">(),</span>
<span class="n">nn</span><span class="p">.</span><span class="n">Linear</span><span class="p">(</span><span class="bp">self</span><span class="p">.</span><span class="n">num_channels</span><span class="p">[</span><span class="o">-</span><span class="mi">1</span><span class="p">],</span> <span class="mi">10</span><span class="p">)</span>
<span class="p">)</span>
<span class="k">def</span> <span class="nf">_make_layer</span><span class="p">(</span><span class="bp">self</span><span class="p">,</span> <span class="n">num_blocks</span><span class="p">,</span> <span class="n">stage_id</span><span class="p">,</span> <span class="n">expansion</span><span class="p">,</span> <span class="n">group_width</span><span class="p">,</span> <span class="n">stride</span><span class="o">=</span><span class="mi">1</span><span class="p">):</span>
<span class="n">strides</span> <span class="o">=</span> <span class="p">[</span><span class="n">stride</span><span class="p">]</span> <span class="o">+</span> <span class="p">[</span><span class="mi">1</span><span class="p">]</span> <span class="o">*</span> <span class="p">(</span><span class="n">num_blocks</span> <span class="o">-</span> <span class="mi">1</span><span class="p">)</span>
<span class="n">layers</span> <span class="o">=</span> <span class="p">[]</span>
<span class="k">for</span> <span class="n">stride</span> <span class="ow">in</span> <span class="n">strides</span><span class="p">:</span>
<span class="k">if</span> <span class="bp">self</span><span class="p">.</span><span class="n">block_type</span> <span class="o">==</span> <span class="s">'bottleneck'</span><span class="p">:</span>
<span class="n">layers</span><span class="p">.</span><span class="n">append</span><span class="p">(</span><span class="n">Bottleneck</span><span class="p">(</span><span class="bp">self</span><span class="p">.</span><span class="n">in_planes</span><span class="p">,</span> <span class="bp">self</span><span class="p">.</span><span class="n">num_channels</span><span class="p">[</span><span class="n">stage_id</span><span class="p">],</span> <span class="n">expansion</span><span class="p">,</span> <span class="n">group_width</span><span class="p">,</span> <span class="n">stride</span><span class="p">))</span>
<span class="k">elif</span> <span class="bp">self</span><span class="p">.</span><span class="n">block_type</span> <span class="o">==</span> <span class="s">'vgg'</span><span class="p">:</span>
<span class="n">layers</span><span class="p">.</span><span class="n">append</span><span class="p">(</span><span class="n">VGGBlock</span><span class="p">(</span><span class="bp">self</span><span class="p">.</span><span class="n">in_planes</span><span class="p">,</span> <span class="bp">self</span><span class="p">.</span><span class="n">num_channels</span><span class="p">[</span><span class="n">stage_id</span><span class="p">],</span> <span class="n">pooling</span><span class="o">=</span><span class="p">(</span><span class="n">stride</span> <span class="o">==</span> <span class="mi">2</span><span class="p">)))</span>
<span class="k">elif</span> <span class="bp">self</span><span class="p">.</span><span class="n">block_type</span> <span class="o">==</span> <span class="s">'inception'</span><span class="p">:</span>
<span class="n">layers</span><span class="p">.</span><span class="n">append</span><span class="p">(</span><span class="n">InceptionBlock</span><span class="p">(</span><span class="bp">self</span><span class="p">.</span><span class="n">in_planes</span><span class="p">,</span> <span class="bp">self</span><span class="p">.</span><span class="n">num_channels</span><span class="p">[</span><span class="n">stage_id</span><span class="p">]</span> <span class="o">//</span> <span class="mi">4</span><span class="p">,</span>
<span class="bp">self</span><span class="p">.</span><span class="n">num_channels</span><span class="p">[</span><span class="n">stage_id</span><span class="p">]</span> <span class="o">//</span> <span class="mi">2</span><span class="p">,</span> <span class="bp">self</span><span class="p">.</span><span class="n">num_channels</span><span class="p">[</span><span class="n">stage_id</span><span class="p">]</span> <span class="o">//</span> <span class="mi">2</span><span class="p">,</span>
<span class="bp">self</span><span class="p">.</span><span class="n">num_channels</span><span class="p">[</span><span class="n">stage_id</span><span class="p">]</span> <span class="o">//</span> <span class="mi">2</span><span class="p">,</span> <span class="bp">self</span><span class="p">.</span><span class="n">num_channels</span><span class="p">[</span><span class="n">stage_id</span><span class="p">]</span> <span class="o">//</span> <span class="mi">8</span><span class="p">,</span> <span class="bp">self</span><span class="p">.</span><span class="n">num_channels</span><span class="p">[</span><span class="n">stage_id</span><span class="p">]</span> <span class="o">//</span> <span class="mi">8</span><span class="p">))</span>
<span class="bp">self</span><span class="p">.</span><span class="n">in_planes</span> <span class="o">=</span> <span class="bp">self</span><span class="p">.</span><span class="n">num_channels</span><span class="p">[</span><span class="n">stage_id</span><span class="p">]</span>
<span class="k">return</span> <span class="n">nn</span><span class="p">.</span><span class="n">Sequential</span><span class="p">(</span><span class="o">*</span><span class="n">layers</span><span class="p">)</span>
<span class="k">def</span> <span class="nf">forward</span><span class="p">(</span><span class="bp">self</span><span class="p">,</span> <span class="n">x</span><span class="p">):</span>
<span class="n">x</span> <span class="o">=</span> <span class="bp">self</span><span class="p">.</span><span class="n">stem</span><span class="p">(</span><span class="n">x</span><span class="p">)</span>
<span class="n">x</span> <span class="o">=</span> <span class="bp">self</span><span class="p">.</span><span class="n">layer1</span><span class="p">(</span><span class="n">x</span><span class="p">)</span>
<span class="n">x</span> <span class="o">=</span> <span class="bp">self</span><span class="p">.</span><span class="n">layer2</span><span class="p">(</span><span class="n">x</span><span class="p">)</span>
<span class="n">x</span> <span class="o">=</span> <span class="bp">self</span><span class="p">.</span><span class="n">layer3</span><span class="p">(</span><span class="n">x</span><span class="p">)</span>
<span class="n">x</span> <span class="o">=</span> <span class="bp">self</span><span class="p">.</span><span class="n">layer4</span><span class="p">(</span><span class="n">x</span><span class="p">)</span>
<span class="n">x</span> <span class="o">=</span> <span class="bp">self</span><span class="p">.</span><span class="n">head</span><span class="p">(</span><span class="n">x</span><span class="p">)</span>
<span class="k">return</span> <span class="n">x</span>
</code></pre></div></div>
<p>We use the Pytorch Lightning framework in order to format our implementation.</p>
<div class="language-python highlighter-rouge"><div class="highlight"><pre class="highlight"><code><span class="k">class</span> <span class="nc">CIFARModule</span><span class="p">(</span><span class="n">pl</span><span class="p">.</span><span class="n">LightningModule</span><span class="p">):</span>
<span class="k">def</span> <span class="nf">__init__</span><span class="p">(</span><span class="bp">self</span><span class="p">,</span> <span class="n">model_hparams</span><span class="p">):</span>
<span class="s">"""
Inputs:
model_hparams - Hyperparameters for the model, as dictionary.
"""</span>
<span class="nb">super</span><span class="p">().</span><span class="n">__init__</span><span class="p">()</span>
<span class="c1"># Exports the hyperparameters to a YAML file, and create "self.hparams" namespace
</span> <span class="bp">self</span><span class="p">.</span><span class="n">save_hyperparameters</span><span class="p">()</span>
<span class="c1"># Create model
</span> <span class="bp">self</span><span class="p">.</span><span class="n">hparams</span><span class="p">.</span><span class="n">model_hparams</span> <span class="o">=</span> <span class="n">model_hparams</span>
<span class="bp">self</span><span class="p">.</span><span class="n">model</span> <span class="o">=</span> <span class="n">AnyNet</span><span class="p">(</span><span class="bp">self</span><span class="p">.</span><span class="n">hparams</span><span class="p">.</span><span class="n">model_hparams</span><span class="p">)</span>
<span class="c1"># Create loss module
</span> <span class="bp">self</span><span class="p">.</span><span class="n">loss_module</span> <span class="o">=</span> <span class="n">nn</span><span class="p">.</span><span class="n">CrossEntropyLoss</span><span class="p">()</span>
<span class="c1"># Example input for visualizing the graph in Tensorboard
</span> <span class="bp">self</span><span class="p">.</span><span class="n">example_input_array</span> <span class="o">=</span> <span class="n">torch</span><span class="p">.</span><span class="n">zeros</span><span class="p">((</span><span class="mi">1</span><span class="p">,</span> <span class="mi">3</span><span class="p">,</span> <span class="mi">224</span><span class="p">,</span> <span class="mi">224</span><span class="p">),</span> <span class="n">dtype</span><span class="o">=</span><span class="n">torch</span><span class="p">.</span><span class="n">float32</span><span class="p">)</span>
<span class="k">def</span> <span class="nf">forward</span><span class="p">(</span><span class="bp">self</span><span class="p">,</span> <span class="n">imgs</span><span class="p">):</span>
<span class="c1"># Forward function that is run when visualizing the graph
</span> <span class="k">return</span> <span class="bp">self</span><span class="p">.</span><span class="n">model</span><span class="p">(</span><span class="n">imgs</span><span class="p">)</span>
<span class="k">def</span> <span class="nf">configure_optimizers</span><span class="p">(</span><span class="bp">self</span><span class="p">):</span>
<span class="c1"># We will support Adam or SGD as optimizers.
</span> <span class="k">if</span> <span class="bp">self</span><span class="p">.</span><span class="n">hparams</span><span class="p">.</span><span class="n">optimizer_name</span> <span class="o">==</span> <span class="s">"Adam"</span><span class="p">:</span>
<span class="c1"># AdamW is Adam with a correct implementation of weight decay (see here
</span> <span class="c1"># for details: https://arxiv.org/pdf/1711.05101.pdf)
</span> <span class="n">optimizer</span> <span class="o">=</span> <span class="n">optim</span><span class="p">.</span><span class="n">AdamW</span><span class="p">(</span><span class="bp">self</span><span class="p">.</span><span class="n">parameters</span><span class="p">(),</span> <span class="o">**</span><span class="bp">self</span><span class="p">.</span><span class="n">hparams</span><span class="p">.</span><span class="n">optimizer_hparams</span><span class="p">)</span>
<span class="k">elif</span> <span class="bp">self</span><span class="p">.</span><span class="n">hparams</span><span class="p">.</span><span class="n">optimizer_name</span> <span class="o">==</span> <span class="s">"SGD"</span><span class="p">:</span>
<span class="n">optimizer</span> <span class="o">=</span> <span class="n">optim</span><span class="p">.</span><span class="n">SGD</span><span class="p">(</span><span class="bp">self</span><span class="p">.</span><span class="n">parameters</span><span class="p">(),</span> <span class="o">**</span><span class="bp">self</span><span class="p">.</span><span class="n">hparams</span><span class="p">.</span><span class="n">optimizer_hparams</span><span class="p">)</span>
<span class="k">else</span><span class="p">:</span>
<span class="k">assert</span> <span class="bp">False</span><span class="p">,</span> <span class="sa">f</span><span class="s">'Unknown optimizer: "</span><span class="si">{</span><span class="bp">self</span><span class="p">.</span><span class="n">hparams</span><span class="p">.</span><span class="n">optimizer_name</span><span class="si">}</span><span class="s">"'</span>
<span class="c1"># We will reduce the learning rate by 0.1 after 100 and 150 epochs
</span> <span class="n">scheduler</span> <span class="o">=</span> <span class="n">optim</span><span class="p">.</span><span class="n">lr_scheduler</span><span class="p">.</span><span class="n">MultiStepLR</span><span class="p">(</span><span class="n">optimizer</span><span class="p">,</span> <span class="n">milestones</span><span class="o">=</span><span class="p">[</span><span class="mi">100</span><span class="p">,</span> <span class="mi">150</span><span class="p">],</span> <span class="n">gamma</span><span class="o">=</span><span class="mf">0.1</span><span class="p">)</span>
<span class="k">return</span> <span class="p">[</span><span class="n">optimizer</span><span class="p">],</span> <span class="p">[</span><span class="n">scheduler</span><span class="p">]</span>
<span class="k">def</span> <span class="nf">training_step</span><span class="p">(</span><span class="bp">self</span><span class="p">,</span> <span class="n">batch</span><span class="p">,</span> <span class="n">batch_idx</span><span class="p">):</span>
<span class="c1"># "batch" is the output of the training data loader.
</span> <span class="n">imgs</span><span class="p">,</span> <span class="n">labels</span> <span class="o">=</span> <span class="n">batch</span>
<span class="n">preds</span> <span class="o">=</span> <span class="bp">self</span><span class="p">.</span><span class="n">model</span><span class="p">(</span><span class="n">imgs</span><span class="p">)</span>
<span class="n">loss</span> <span class="o">=</span> <span class="bp">self</span><span class="p">.</span><span class="n">loss_module</span><span class="p">(</span><span class="n">preds</span><span class="p">,</span> <span class="n">labels</span><span class="p">)</span>
<span class="n">acc</span> <span class="o">=</span> <span class="p">(</span><span class="n">preds</span><span class="p">.</span><span class="n">argmax</span><span class="p">(</span><span class="n">dim</span><span class="o">=-</span><span class="mi">1</span><span class="p">)</span> <span class="o">==</span> <span class="n">labels</span><span class="p">).</span><span class="nb">float</span><span class="p">().</span><span class="n">mean</span><span class="p">()</span>
<span class="c1"># Logs the accuracy per epoch to tensorboard (weighted average over batches)
</span> <span class="bp">self</span><span class="p">.</span><span class="n">log</span><span class="p">(</span><span class="s">"train_acc"</span><span class="p">,</span> <span class="n">acc</span><span class="p">,</span> <span class="n">on_step</span><span class="o">=</span><span class="bp">False</span><span class="p">,</span> <span class="n">on_epoch</span><span class="o">=</span><span class="bp">True</span><span class="p">)</span>
<span class="bp">self</span><span class="p">.</span><span class="n">log</span><span class="p">(</span><span class="s">"train_loss"</span><span class="p">,</span> <span class="n">loss</span><span class="p">)</span>
<span class="k">return</span> <span class="n">loss</span> <span class="c1"># Return tensor to call ".backward" on
</span>
<span class="k">def</span> <span class="nf">validation_step</span><span class="p">(</span><span class="bp">self</span><span class="p">,</span> <span class="n">batch</span><span class="p">,</span> <span class="n">batch_idx</span><span class="p">):</span>
<span class="n">imgs</span><span class="p">,</span> <span class="n">labels</span> <span class="o">=</span> <span class="n">batch</span>
<span class="n">preds</span> <span class="o">=</span> <span class="bp">self</span><span class="p">.</span><span class="n">model</span><span class="p">(</span><span class="n">imgs</span><span class="p">).</span><span class="n">argmax</span><span class="p">(</span><span class="n">dim</span><span class="o">=-</span><span class="mi">1</span><span class="p">)</span>
<span class="n">acc</span> <span class="o">=</span> <span class="p">(</span><span class="n">labels</span> <span class="o">==</span> <span class="n">preds</span><span class="p">).</span><span class="nb">float</span><span class="p">().</span><span class="n">mean</span><span class="p">()</span>
<span class="c1"># By default logs it per epoch (weighted average over batches)
</span> <span class="bp">self</span><span class="p">.</span><span class="n">log</span><span class="p">(</span><span class="s">"val_acc"</span><span class="p">,</span> <span class="n">acc</span><span class="p">)</span>
<span class="k">def</span> <span class="nf">test_step</span><span class="p">(</span><span class="bp">self</span><span class="p">,</span> <span class="n">batch</span><span class="p">,</span> <span class="n">batch_idx</span><span class="p">):</span>
<span class="n">imgs</span><span class="p">,</span> <span class="n">labels</span> <span class="o">=</span> <span class="n">batch</span>
<span class="n">preds</span> <span class="o">=</span> <span class="bp">self</span><span class="p">.</span><span class="n">model</span><span class="p">(</span><span class="n">imgs</span><span class="p">).</span><span class="n">argmax</span><span class="p">(</span><span class="n">dim</span><span class="o">=-</span><span class="mi">1</span><span class="p">)</span>
<span class="n">acc</span> <span class="o">=</span> <span class="p">(</span><span class="n">labels</span> <span class="o">==</span> <span class="n">preds</span><span class="p">).</span><span class="nb">float</span><span class="p">().</span><span class="n">mean</span><span class="p">()</span>
<span class="c1"># By default logs it per epoch (weighted average over batches), and returns it afterwards
</span> <span class="bp">self</span><span class="p">.</span><span class="n">log</span><span class="p">(</span><span class="s">"test_acc"</span><span class="p">,</span> <span class="n">acc</span><span class="p">)</span>
</code></pre></div></div>
<p>The comprehensive trainging and testing code on CIFAR10 can also be found in this <a href="https://colab.research.google.com/drive/1VHs30ePx0WgZ6p4MterdcLxJBi70r6Tg?usp=sharing">notebook</a>. You may want to take a look at the notebook and experiment with the code to gain a deeper understanding of how the AnyNet architecture works and how it can be trained on the CIFAR-10 dataset.</p>
<h1 id="discussion">Discussion</h1>
<p>In this blog post, we have provided an overview of the AnyNet architecture and its key components, as well as an implementation of the AnyNet model using PyTorch. We have also demonstrated how to train and evaluate the model on the CIFAR-10 dataset. Additionally, note that while we have covered the intuition and implementation of AnyNet, there is still another important aspect of designing neural networks: choosing hyperparameters and defining a search space for the internal architecture of the block. We will discuss this in more detail in a separate post.</p>Nguyễn Quốc CườngLearning Note On Convotional Neural Network Variants Part 22023-01-23T00:00:00+00:002023-01-23T00:00:00+00:00https://quoccuonglqd.github.io//quoccuonguit/blogs/CNN%20Variation%20Part%202<h1 id="1-introduction">1/ Introduction:</h1>
<p>In Part 1 of our exploration of the intuition behind famous CNN architectures, we gained an understanding of the building blocks that make up these models. In Part 2, we will delve deeper into some of the most widely used CNN architectures, including MobileNet, SENet, EfficientNet and HRNet. We will examine the design decisions that led to their creation, the challenges they aim to overcome, and the impact they have had on the field of computer vision. Whether you are a beginner looking to understand the basics or an experienced practitioner looking to expand your knowledge, Part 2 will provide you with a comprehensive overview of these cutting-edge models and their underlying principles.</p>
<h1 id="2-famous-network">2/ Famous network:</h1>
<h2 id="26-mobilenet">2.6 MobileNet</h2>
<p>The MobileNet model is a convolutional neural network (CNN) developed by Google specifically for mobile devices. It was designed to be small, efficient, and fast, making it well-suited for use on mobile devices with limited computational resources.</p>
<p>
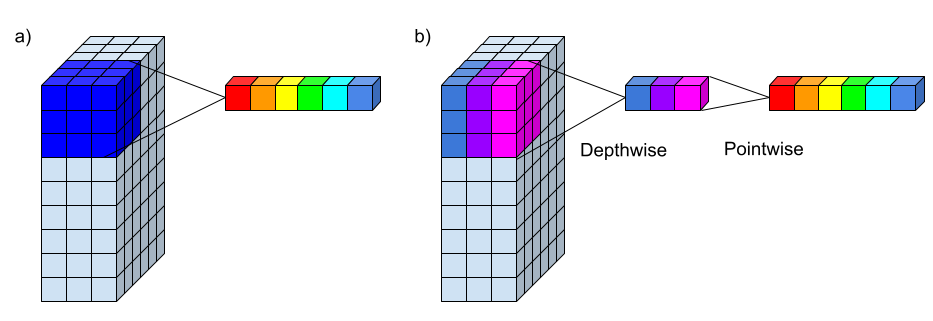
One of the key innovations of the MobileNet model is the use of depthwise separable convolutions, which allow the model to learn more efficient and compact networks.</p>
<p>In a standard convolutional layer, the filters are applied to the input feature maps in a sliding window fashion, with the output being a weighted sum of the values in the input window. This process is repeated for every location in the input feature maps to produce the output feature maps.</p>
<p>In a depthwise separable convolution, the filters are applied to the input feature maps in a different way. Instead of applying a single filter to the entire input feature maps, a separate filter is applied to each channel (or “depth”) in the input feature maps. This process is known as a “depthwise” convolution.</p>
<p>After the depthwise convolution, a second convolution is applied a 1x1 convolution to the output of the depthwise convolution, using a set of filters that are shared across all the channels (or “depths”) of the input to scale the depth of the feature map. This process is known as the “pointwise” convolution.</p>
<p><img src="../assets/images/CNN/depthwiseconvolution.png" width="600" /></p>
<p><strong>Figure 1</strong> Depthwise Convolution Layer. <a href="https://www.paepper.com/blog/posts/depthwise-separable-convolutions-in-pytorch/depthwise-separable-convolution.png">Source</a></p>
<p>The depthwise separable convolution allows the model to learn more efficient and compact networks, as the number of parameters and the computational cost are significantly reduced. It also allows the model to learn more complex features, as the depthwise convolution allows the model to learn features that are specific to each channel, while the pointwise convolution allows the model to combine these features in a more flexible way.</p>
<p>MobileNetV2, introduces an inverted residual block, which is essentially a inversed version of the residual block using depthwise separable convolution layer. This block applies a linear bottleneck transformation before and after the depthwise convolution operation. The linear bottleneck transformation in an inverted residual block refers to the use of a 1x1 convolution layer with a small number of filters before and after the depthwise convolution operation.</p>
<p>A traditional residual block has a structure where the input has a high number of channels, which is first compressed using a 1x1 convolution to reduce the number of channels. Then, the number of channels is increased again with another 1x1 convolution, and the output of the block is the sum of the input and the output of the second 1x1 convolution. Inverted residual blocks, on the other hand, have a structure that first widens the input with a 1x1 convolution, then uses a 3x3 depthwise convolution to greatly reduce the number of parameters. Finally, the number of channels is reduced again with another 1x1 convolution, and the output of the block is the sum of the input and the output of the second 1x1 convolution.</p>
<p><img src="../assets/images/CNN/inverted_residual.png" width="600" /></p>
<p><strong>Figure 2</strong> Inverted Residual Block. <a href="https://arxiv.org/abs/1801.04381v4">Source</a></p>
<p>This design comes from a premise that non-linear activations result in information loss, means that applying non-linear transformations to the feature maps can reduce the amount of information that is preserved. The ReLU activation function is widely used in neural networks because it can increase the representational complexity of the network. However, it can also result in information loss if the activation collapses certain channels. In this case, the information in that channel is lost and cannot be recovered.</p>
<p>However, if the network has a large number of channels, it’s possible that the information lost in one channel can still be preserved in other channels. If the input manifold can be embedded into a lower-dimensional subspace of the activation space, then the ReLU transformation can preserve the information while still introducing the needed complexity into the set of expressible functions.</p>
<p>Also, to preserve most of needed information, it’s important that the input and output of inverted residual block are obtained via a linear transformation. In other words, we <strong>do not</strong> use the non-linear ReLU activation function on the final 1x1 convolution that maps back to low-dimensional space.</p>
<p><img src="../assets/images/CNN/inverted_residual_detail.PNG" width="600" /></p>
<p><strong>Figure 3</strong> Representation of the inverted residual layer. <a href="https://arxiv.org/abs/1801.04381v4">Source</a></p>
<h2 id="27-senet">2.7 SENet</h2>
<p>The Squeeze-and-Excitation (SE) network is a convolutional neural network (CNN) that was developed to improve the performance of CNNs on image classification tasks. It was introduced in the paper “Squeeze-and-Excitation Networks” by Jie Hu, Li Shen, and Gang Sun in 2018.</p>
<p>The main idea behind the SE network is to use a “squeeze” operation to reduce the spatial dimensions (height and width) of the input feature maps, and an “excitation” operation to re-scale the feature maps based on their relative importance, allow for efficient information transfer between locations. The squeeze operation is implemented using a global average pooling layer, which reduces the spatial dimensions of the input feature maps and outputs a vector of summary statistics. The excitation operation is implemented using a fully connected (FC) layer and a sigmoid activation function, which re-scales the input feature maps based on their relative importance.</p>
<p>Global average pooling is a type of pooling operation that is used in convolutional neural networks (CNNs). It is a method of down-sampling the spatial dimensions (height and width) of the input feature maps, while retaining the depth (number of channels).</p>
<p>In global average pooling, the input feature maps are first passed through a pooling layer, which applies a function (such as the average or the maximum) to each patch of the feature maps. The output of the pooling layer is a set of summary statistics that describe the features in each patch.The global average pooling layer then takes the summary statistics and reduces the spatial dimensions of the input feature maps by taking the average value over the entire spatial dimensions. This produces a single value for each channel in the input feature maps, which can then be passed to the next layer of the network.</p>
<p>The excitation operation then applies a fully connected layer (also called a dense layer) to the output of the squeeze operation, followed by a sigmoid activation function. This produces a set of channel-wise weights that are used to adjust the importance of each channel in the input feature maps. In this way, it plays a similar role as the famous attention mechanism.</p>
<p>People may wonder why we use the Sigmoid function. The sigmoid function is used in the excitation operation because it produces a set of channel-wise weights that are used to adjust the importance of each channel in the input feature maps. These weights are not mutually exclusive, as they can have values between 0 and 1, which means that it can be interpreted as a probability that represents the importance of a channel. The sigmoid function is appropriate for this purpose because it maps its input to a value between 0 and 1, which makes it easy to interpret the output as a probability.</p>
<p>Other function, like the softmax function, on the other hand, is typically used in the final output layer of a neural network to produce a probability distribution over the classes. These probabilities are mutually exclusive, as each class can have a probability between 0 and 1, and the sum of the probabilities should be 1.</p>
<p><img src="../assets/images/CNN/seblock.png" width="600" /></p>
<p><strong>Figure 4</strong> Squeeze-And-Excitation Block. <a href="https://www.google.com/url?sa=i&url=https%3A%2F%2Farxiv.org%2Fpdf%2F1901.01493&psig=AOvVaw1slGS1lT-Bg71WfHyT-o1X&ust=1674493084723000&source=images&cd=vfe&ved=0CBAQjRxqFwoTCODRhYXT2_wCFQAAAAAdAAAAABAh">Source</a></p>
<p>Finally, the input feature maps are multiplied element-wise by the channel-wise weights to produce the output of the SE block. This process allows the network to focus on the most important channels and suppress the less important ones, resulting in a more robust and accurate representation of the input.</p>
<p>The SE network can be incorporated into any CNN by adding the squeeze and excitation operations to the intermediate layers of the network. It has been shown to improve the performance of CNNs on a variety of image classification tasks and has been widely adopted in the field of computer vision.</p>
<p>Overall, the SE network is a powerful tool for improving the performance of CNNs on image classification tasks, and has had a significant impact on the field of computer vision.</p>
<h2 id="28-efficientnet">2.8/ EfficientNet:</h2>
<p>EfficientNet is a convolutional neural network (CNN) architecture that has been designed to improve upon previous state-of-the-art models by increasing the model’s capacity while also reducing the number of parameters and computational cost. The EfficientNet architecture is achieved through a combination of techniques such as compound scaling, which adjusts the resolution, depth, and width of the network in a systematic and principled manner, and the use of a mobile inverted bottleneck (MBConv) block, which is a more efficient version of the standard inverted bottleneck block.</p>
<p>They introduced a new approach to studying and designing deep neural networks. Prior to EfficientNet, the common practice was to manually design network architectures with a fixed number of layers and layer sizes. EfficientNet, instead, introduced an automated scaling method that balances network depth, width, and resolution to achieve improved accuracy and efficiency. That is something more closer to a systematic exploration of the design space that deep networks offer.</p>
<p>The study found that a good balance between the width, depth, and resolution of the network is important for the model’s performance. And that this balance can be achieved by proportionally adjusting the width, depth, and resolution with the same scaling factor. The author also provided an example of how to increase the computational resources used by the network by a factor of $2^N$. The method proposed in this statement is to increase the network depth, width, and image size simultaneously with a scaling factor that is determined by a small grid search on the original small model. The idea is to use three different constant coefficients, $\alpha$, $\beta$, and $\gamma$, such that $\alpha \cdot \beta^2 \cdot \gamma^2 \approx 2\alpha$ $\alpha \geq 1, \beta \geq 1, \gamma \geq 1$ to scale the depth, width, and image size respectively. These coefficients are determined by a small grid search on the original small model, which means that a small range of values for each coefficient is tested, and the best coefficients are selected based on the model’s performance. For example, if we want to use 8 times more computational resources ($N=3$), then we can increase the network depth by $α^3$, width by $β^3$ and image size by $γ^3$. This will increase the computational resources used by the network by a factor of $2^3 = 8$.</p>
<p>The authors developed their baseline network by using a multi-objective neural architecture search (NAS) that aims to optimize both accuracy and FLOPS (floating point operations per second). The main building block is mobile inverted bottleneck from MobileNetV2, combined with squeeze-and-excitation optimization.</p>
<p>The EfficientNetV2 is similar to the original EfficientNet, but it uses a upgraded neural architecture search (NAS) to find the baseline architecture. The NAS framework used in EfficientNetV2 is based on previous NAS works and aims to jointly optimize accuracy, parameter efficiency, and training efficiency on modern accelerators. The search space used in EfficientNetV2 is a stage-based factorized space that consists of design choices for convolutional operation types, number of layers, kernel size, and expansion ratio. The search space is also reduced by removing unnecessary search options and reusing the same channel sizes from the backbone. The search reward used in EfficientNetV2 combines the model accuracy, normalized training step time, and parameter size using a simple weighted product. The goal is to balance the trade-offs between accuracy, efficiency, and parameter size.</p>
<p>A mechanism named Progressive Learning is also introduced in EfficientNetV2 to gradually increase the resolution of the input images during training. The idea behind this technique is that it allows the model to learn the low-level features of the input images first, and then gradually increase the resolution to learn more complex features. This can make the training process more efficient and help the model converge faster. In practice, Progressive Learning is implemented by starting with low-resolution images and increasing the resolution over time. This can be done by progressively increasing the resolution coefficient, which controls the resolution of the input images. The progressive learning also help to reduce the overfitting that can happen when training a model on high resolution images. By starting with low-resolution images, the model can learn general features that are applicable to all resolutions, and then fine-tune these features as the resolution increases.</p>
<p><img src="../assets/images/CNN/pandatrain_page-0001.jpg" width="600" /></p>
<p><strong>Figure 5</strong> Progressive Learning Progress. <a href="https://arxiv.org/abs/2104.00298">Source</a></p>
<p>There is an observation that we should also adjust the regularization strength accordingly to different image sizes. Progressive Learning with adaptive Regularization was proposed to address this insight byy gradually increasing the complexity of the network while also adjusting the regularization strength. There are 3 types of regularization techniques used in EfficientNet: Dropout, RandAugment, Mixup.</p>
<p><img src="../assets/images/CNN/pandamixup_page-0001.jpg" width="600" /></p>
<p><strong>Figure 6</strong> Mixup Augmentation Technique. <a href="https://arxiv.org/abs/2104.00298">Source</a></p>
<!-- The intuition of the scaling logic comes from 2 observations:
- "Scaling up any dimension of network
width, depth, or resolution improves accuracy, but the accuracy gain diminishes for bigger models". This statement is saying that increasing any dimension of the network (width, depth, or resolution) can improve the accuracy of the model, but that this improvement becomes less significant as the model becomes larger. In other words, when you increase the width, depth or resolution of the network, you are adding more parameters and computations to the model which in turn can improve the accuracy of the model, but as the model becomes larger, the accuracy gain from adding more parameters and computations becomes less significant. This is due to the fact that larger models are more prone to overfitting, and the incremental benefit of adding more parameters and computations becomes smaller.
- "In order to pursue better accuracy and efficiency, it is critical to balance all dimensions of network width, depth, and resolution during ConvNet scaling." This statement is emphasizing the importance of balancing the dimensions of network width, depth, and resolution when scaling up a convolutional neural network (ConvNet) in order to achieve better accuracy and efficiency. -->
<!-- One of the key advantages of EfficientNet is that it can achieve state-of-the-art performance on a number of image classification benchmarks while also being more computationally efficient than previous models. This means that EfficientNet can be used to train large and complex models while still being able to run on devices with limited computational resources, such as smartphones or embedded devices.
Another important aspect of EfficientNet is that it can be easily scaled to different datasets and tasks. This is achieved through the use of a compound scaling method, which allows the model to be scaled up or down in a systematic and principled manner. This means that EfficientNet can be used for a wide range of image classification tasks, from small datasets to large-scale datasets, without the need for significant modifications to the model architecture. -->
<p>Overall, EfficientNet is a powerful and versatile CNN architecture that has the potential to revolutionize the way we train and deploy large and complex models. Its ability to achieve state-of-the-art performance while also being computationally efficient makes it an ideal choice for a wide range of image classification tasks, from small datasets to large-scale datasets.</p>
<h2 id="29-hrnet">2.9 HRNet:</h2>
<p>HRNet, short for High-Resolution Network, is a state-of-the-art deep learning model for image understanding tasks such as object detection, semantic segmentation, and human pose estimation. It was first introduced by a team of researchers at the Multimedia Laboratory of the Chinese University of Hong Kong led by Dr. Ke Sun.</p>
<p>Before HRNet was published, the process of high-resolution recovery was typically achieved through the use of architectures such as Hourglass, SegNet, DeconvNet, U-Net, SimpleBaseline, and encoder-decoder networks. These architectures used a combination of upsampling and dilated convolutions to increase the resolution of the representations outputted by a classification or classification-like network. HRNet aims to improve upon these previous methods by introducing a new architecture that is specifically designed to learn high-resolution representations.</p>
<p>The observation that led to the idea of HRNet is that the existing state-of-the-art methods for these position-sensitive vision problems adopted the high-resolution recovery process to raise the representation resolution from the low-resolution representation outputted by a classification or classification-like network, which leads to loss of spatial precision. The researchers behind HRNet noticed that maintaining high-resolution representations throughout the entire process could potentially lead to more spatially precise representations and ultimately improve performance on these position-sensitive tasks.</p>
<p>The authors of the paper proposed a novel architecture that allows for the maintenance of high-resolution representations throughout the whole process. The network is composed of multiple stages, each stage contains multiple streams that correspond to different resolutions. The network performs repeated multi-resolution fusions by exchanging information across the parallel streams, allowing for the preservation of high-resolution information, and repeating multi-resolution fusions to boost the high-resolution representations with the help of the low-resolution representations.</p>
<p><img src="../assets/images/CNN/traditionalone withhrnet.jpg" width="600" /></p>
<p><strong>Figure 7</strong> Traditional High Resolution Revovery (Above) Vs HRNet (Below). <a href="https://arxiv.org/abs/1908.07919">Source</a></p>
<p>HRNet maintain high-resolution representations throughout the network by starting with a high-resolution convolution stream as the first stage, and gradually adding high-to-low resolution streams one by one, forming new stages. The parallel streams at each stage consist of the resolutions from the previous stage, and an extra lower one, which allows for multi-resolution fusions and the ability to maintain high-resolution representations throughout the network. This architecture is called Parallel Multi-Resolution Convolutions.</p>
<p>Repeated Multi-Resolution Fusions is a technique used in the HRNet architecture to fuse representations from different resolution streams. This is done by repeatedly applying a transform function on each resolution stream, that is dependent on the input resolution index $x$ and the output resolution index r. The transform function is used to align the number of channels between the high-resolution and low-resolution representations. If the output resolution index ($r × r$) is lower than the input resolution index ($x × x$), the transform function ($f_{r}(·)$) downsamples the input representation (R) through $(r - x)$ stride-2 $3 × 3$ convolutions. For example, one stride-2 $3 × 3$ convolution for 2× downsampling, and two consecutive stride-2 $3 × 3$ convolutions for 4× downsampling. If the output resolution is higher than the input resolution, the transform function is upsampling the input representation $R$ through the bilinear upsampling followed by a $1 × 1$ convolution for aligning the number of channels.</p>
<p><img src="../assets/images/CNN/representationhead.jpg" width="600" /></p>
<p><strong>Figure 8</strong> The representation head of HRNetV1, HRNetV2, HRNetV2p. <a href="https://arxiv.org/abs/1908.07919">Source</a></p>
<p>The resulting network is called HRNetV1, which is mainly applied to human pose estimation and achieves state-of-the-art results on COCO keypoint detection dataset. HRNetV2, on the other hand, combines the representations from all the high-to-low resolution parallel streams and is mainly applied to semantic segmentation, achieving state-of-the-art results on PASCAL-Context, Cityscapes, and LIP datasets. HRNetV2p is an extension of HRNetV2, which construct a multi-level representation and is applied to object detection and joint detection and instance segmentation. It improves the detection performance, particularly for small objects.</p>
<h1 id="conclusion">Conclusion:</h1>
<p>Overall, this blog post aimed to provide an intuitive understanding of famous CNN architectures and techniques, and how they can be used to improve the performance of CNNs. These architectures and techniques have been proven to be highly effective in a wide range of image classification tasks and are widely used in modern deep learning applications.</p>
<p>Part 2 of this blog has explored the various architectures and techniques used in modern CNNs to improve their performance. In part 3 of this blog, we will delve deeper into other architectures that are less known but being used in various modern CNNs and explore their specific use cases and advantages.</p>Nguyễn Quốc CườngLearning Note On Convotional Neural Network Variants Part 12023-01-03T00:00:00+00:002023-01-03T00:00:00+00:00https://quoccuonglqd.github.io//quoccuonguit/blogs/CNN%20Variation%20Part%201<h1 id="1-introduction">1/ Introduction:</h1>
<p>Hello and welcome to my blog post on famous variants of convolutional neural networks (CNNs)! If you’re reading this, chances are you’re just as passionate about deep learning and computer vision as I am. CNNs are an integral part of the field, and have been responsible for some of the most impressive breakthroughs in image classification and object recognition. In this post, I’ll be introducing you to some of the most famous CNNs that have been developed over the years and discussing their unique characteristics and contributions to the field. Whether you’re a seasoned deep learning practitioner or just starting out, I hope this post will inspire you to dive deeper into the world of CNNs and learn more about how they work. So without further ado, let’s get started!</p>
<h1 id="2-famous-network">2/ Famous network:</h1>
<h2 id="21-lenet">2.1/ LeNet:</h2>
<p>LeNet is a convolutional neural network (CNN) that was developed by Yann LeCun in the 1990s. It was one of the first CNNs and is often considered the “hello world” of CNNs. LeNet was designed to recognize handwritten digits and was widely used for this purpose. It was also used for character recognition and face detection, among other applications.</p>
<p>LeNet consists of a series of convolutional and max-pooling layers, followed by a series of fully connected (dense) layers. It uses a combination of local and global features to recognize patterns in the input data. The local features are learned by the convolutional layers, which apply a set of filters to the input data and detect patterns at different scales. The global features are learned by the fully connected layers, which process the entire input image and capture more abstract patterns.</p>
<p><img src="../assets/images/CNN/lenet_data2.png" width="600" /></p>
<p>LeNet consists of 7 layers in total:</p>
<ul>
<li>
<p>Input layer: This layer takes in the input image, which is a 2D array of pixels.</p>
</li>
<li>
<p>Convolutional layer 1: This layer applies a set of filters to the input image and produces a feature map. The filters are used to detect patterns in the input data, such as edges and corners. Each filter slides over the input image, performs a dot product with the input data, and produces a single output value. The output values are then stacked to form the feature map.</p>
</li>
<li>
<p>Pooling layer 1: This layer performs down-sampling by applying a max-pooling operation to the feature map. The max-pooling operation divides the feature map into non-overlapping regions and selects the maximum value from each region. This has the effect of reducing the spatial resolution of the feature map, but it also helps to reduce the number of parameters and computational cost.</p>
</li>
<li>
<p>Convolutional layer 2: This layer is similar to the first convolutional layer, but it operates on the output of the first pooling layer. It applies a set of filters to the down-sampled feature map and produces a new feature map.</p>
</li>
<li>
<p>Pooling layer 2: This layer is similar to the first pooling layer, but it operates on the output of the second convolutional layer. It performs down-sampling by applying a max-pooling operation to the feature map.</p>
</li>
<li>
<p>Fully connected layer 1: This layer takes in the output of the second pooling layer and processes it using a series of weights and biases. It converts the 2D feature map into a 1D vector, which is then passed through a non-linear activation function. The activation function introduces non-linearity to the model, which allows it to learn more complex patterns in the data.</p>
</li>
<li>
<p>Output layer: This layer takes in the output of the fully connected layer and produces the final prediction. It consists of a single neuron for each class, with a softmax activation function applied to the output. The softmax activation function converts the output of the neuron into a probability distribution over the classes, with the highest probability corresponding to the predicted class.</p>
</li>
</ul>
<p>LeNet was a pioneering achievement in the field of deep learning and helped to establish CNNs as a powerful tool for image recognition and other tasks. It has had a lasting impact on the field and continues to be studied and referenced by researchers today.</p>
<h2 id="22-vgg">2.2/ VGG</h2>
<p>The VGG network was developed after the AlexNet, which was the winning model of the ImageNet Large Scale Visual Recognition Challenge (ILSVRC) in 2012. There are a few key differences between the VGG network and AlexNet:</p>
<ul>
<li>
<p>Filter size: AlexNet uses a combination of small (size 3x3) and large (size 11x11) filters in its convolutional layers, while the VGG network only uses small (size 3x3) filters. This allows the VGG network to learn more fine-grained features, but at the cost of increased computational complexity.</p>
</li>
<li>
<p>Number of layers: AlexNet is a shallower network compared to the VGG network, with a total of 8 layers (5 convolutional and 3 fully connected). The VGG network, on the other hand, is much deeper, with a total of 16 layers (13 convolutional and 3 fully connected). This allows the VGG network to learn more complex features, but again at the cost of increased computational complexity.</p>
</li>
<li>
<p>Training method: AlexNet was trained using the method of stochastic gradient descent with momentum (SGDM), while the VGG network was trained using the method of stochastic gradient descent with momentum and weight decay (SGDM+WD). The latter method is generally considered to be more stable and less prone to overfitting.</p>
</li>
</ul>
<p>The VGG network introduced a new architectural design for convolutional neural networks (CNNs) that has been widely adopted in many subsequent CNN models. This design consists of stacking several convolutional layers followed by a pooling layer, and repeating this pattern multiple times. The pooling layer is typically inserted after every two or three convolutional layers and serves to down-sample the feature maps produced by the convolutional layers, reducing the spatial dimensions while maintaining the most important information.</p>
<p><img src="../assets/images/CNN/vgg16.png" width="600" /></p>
<p>This architectural design has several benefits:</p>
<ul>
<li>
<p>It allows the CNN to learn more complex features, as the stacked convolutional layers are able to build on top of each other and combine simple features to form more complex ones.</p>
</li>
<li>
<p>It reduces the number of parameters in the model, as the pooling layers serve to reduce the spatial dimensions of the feature maps. This makes the model more efficient and less prone to overfitting.</p>
</li>
<li>
<p>It makes the model more translation invariant, as the pooling layers reduce the sensitivity of the model to small translations in the input.</p>
</li>
</ul>
<p>In general, the number of channels in the output feature maps of a convolutional layer is a hyperparameter that can be chosen by the designer of the CNN. In many CNNs, including the VGG network, the number of channels in the output feature maps of a convolutional layer is kept constant across all the convolutional layers. This means that if the number of channels in the input feature maps is <img src="https://render.githubusercontent.com/render/math?math=C_{in}" />, the number of channels in the output feature maps of all the convolutional layers will also be <img src="https://render.githubusercontent.com/render/math?math=C_{\text{out}}" /> = <img src="https://render.githubusercontent.com/render/math?math=C_{in}" />.</p>
<p>There are a few reasons why this pattern is commonly used:</p>
<ul>
<li>
<p>It allows the model to learn more complex features, as the same number of filters is applied to the input feature maps at each convolutional layer.</p>
</li>
<li>
<p>It simplifies the design of the model, as the number of channels does not need to be changed at each layer.</p>
</li>
<li>
<p>It reduces the number of hyperparameters in the model, as the number of channels does not need to be tuned.</p>
</li>
</ul>
<p>That being said, it is not strictly necessary to keep the number of channels constant across all the convolutional layers, and some CNNs do vary the number of channels from one layer to the next. However, this is less common and may require more careful hyperparameter tuning to achieve good performance</p>
<p>Overall, the VGG network represents an improvement over AlexNet in terms of performance on image classification tasks, thanks to its deeper architecture and more effective training method. However, it is also more computationally complex and may be less suitable for certain applications where computational resources are limited.</p>
<p>Anyway, the VGG network has been widely used as a benchmark model for image classification tasks, and it has achieved excellent results on a variety of datasets. It is a good choice for researchers and practitioners who are looking for a simple yet effective model for image classification tasks.</p>
<h2 id="23-resnet">2.3/ ResNet:</h2>
<p>The ResNet (short for “Residual Network”) is a convolutional neural network that was developed by Microsoft Research and was the winning model of the ImageNet Large Scale Visual Recognition Challenge (ILSVRC) in 2015. It is known for its extremely deep architecture, which allows it to outperform other models on a variety of image classification tasks.</p>
<p>One of the key innovations of the ResNet model is the use of residual connections, which allow the model to learn much deeper networks without suffering from the problem of vanishing gradients. In a residual connection, the input to a layer is added to the output of the same layer, allowing the model to learn an additional “residual” function on top of the basic function learned by the layer. This allows the model to learn much deeper networks without the performance degradation that usually occurs when the depth of the network is increased.</p>
<p><img src="../assets/images/CNN/resnet34.png" width="600" /></p>
<p>In contrast, CNNs without residual connections have to learn the entire function from scratch at each layer, which becomes increasingly difficult as the depth of the network increases. This can lead to the problem of vanishing gradients, where the gradients of the parameters with respect to the loss function become very small, making it difficult for the network to learn effectively.</p>
<p>Overall, residual connections are a powerful tool for learning deep CNNs, and have been shown to be very effective in practice. They have allowed the development of very deep CNNs, such as the ResNet model, which have achieved state-of-the-art results on a variety of image classification tasks.</p>
<p>Another key characteristic of the ResNet model is its use of “bottleneck” layers, which is a type of convolutional layer that is used to reduce the dimensionality of the input before passing it through several layers of “residual” blocks.The bottleneck layer is typically composed of three separate operations: a 1x1 convolutional layer, a 3x3 convolutional layer, and another 1x1 convolutional layer, in that order. The 1x1 convolutions are used to compress and expand the number of channels in the input, while the 3x3 convolution is used to preserve spatial information. Compressing the number of channels in the input before passing it through multiple layers of residual blocks in a ResNet architecture is useful for a couple of reasons:</p>
<ul>
<li>
<p>Computational efficiency: By reducing the number of channels, the number of computations required to process the input is also reduced. This can significantly reduce the overall computational cost of the network, making it more practical to train and deploy on resource-constrained devices.</p>
</li>
<li>
<p>Regularization: The 1x1 convolutional layer in the bottleneck layer can act as a form of regularization by reducing the number of parameters in the network, which can help to prevent overfitting.</p>
</li>
<li>
<p>Depth-wise separable convolution: Compressing the number of channels in the input allows for the use of depth-wise separable convolution, which can speed up the computation of the network by reducing the number of parameters in the network.</p>
</li>
<li>
<p>Feature reuse: By compressing the number of channels in the input, the network can learn more complex representations, which can be reused across multiple layers of the network.</p>
</li>
</ul>
<p>In the original ResNet architecture, pooling layers are used to reduce the spatial dimensions of the feature maps as they pass through the network. Specifically, the pooling is used after the first convolutional layer and some of the residual blocks to reduce the spatial dimensions by a factor of 2. This helps to reduce the computational cost of the network by decreasing the number of parameters and computations required to process the input. It’s worth noting that some ResNet variants, such as ResNet-v2, do not use pooling layers. Instead, they use a stride of 2 in the first convolutional layer to reduce the spatial dimensions of the feature maps.</p>
<p>The original ResNet model, ResNet-50, has 50 layers and is made up of a series of convolutional layers, bottleneck layers, and residual connections. It is a very deep network, with over 25 million parameters, and has achieved state-of-the-art results on a variety of image classification tasks.</p>
<h2 id="24-densenet">2.4/ DenseNet</h2>
<p>The DenseNet model was developed by Gao Huang, Zhuang Liu, Laurens van der Maaten, and Kilian Q. Weinberger at Cornell University. It was published in the conference paper “Densely Connected Convolutional Networks” in 2017, and has since become one of the most widely used and influential CNN models in the field of computer vision.</p>
<p>The ResNet and DenseNet models are both convolutional neural networks (CNNs) that have been developed to address the problem of learning deep networks. They both have achieved state-of-the-art results on a variety of image classification tasks and have been widely adopted in the field of computer vision. However, they have some key differences in their design and characteristics:</p>
<p>Architecture: The ResNet model uses a residual connection, where the input to a layer is added to the output of the same layer, to allow the model to learn much deeper networks without suffering from the problem of vanishing gradients. The DenseNet model, on the other hand, uses a dense connection, where each layer is connected to all the subsequent layers, to allow the model to learn more efficient and compact networks.
<img src="../assets/images/CNN/densenet121.jpg" width="600" /></p>
<p><strong>Figure</strong> DenseNet Architecture. <a href="https://paperswithcode.com/lib/torchvision/densenet">Source</a></p>
<p>Number of parameters: The ResNet model has a larger number of parameters than the DenseNet model, as it has to learn both the basic function and the residual function at each layer. The DenseNet model, on the other hand, has a smaller number of parameters, as it only has to learn the basic function at each layer and can re-use features learned by the previous layers.</p>
<p>Training efficiency: The DenseNet model is generally more efficient to train than the ResNet model, as it has a smaller number of parameters and can re-use features learned by the previous layers. This allows the DenseNet model to achieve good performance with fewer training examples and faster training times.</p>
<p>The DenseNet model is known for its efficient and compact design, which allows it to achieve good performance with a smaller number of parameters and faster training times. This is achieved through the use of dense connections, where each layer is connected to all the subsequent layers, allowing the model to learn more efficient and compact networks.</p>
<p>The ResNet model, on the other hand, is known for its ability to learn very deep networks without suffering from the problem of vanishing gradients. This is achieved through the use of residual connections, where the input to a layer is added to the output of the same layer, allowing the model to learn an additional “residual” function on top of the basic function learned by the layer. The ResNet model has a larger number of parameters than the DenseNet model, as it has to learn both the basic function and the residual function at each layer.</p>
<p>Overall, both the ResNet and DenseNet models are powerful tools for learning deep CNNs, and they have their own unique characteristics and strengths. Which one is the best choice for a particular task will depend on the specific requirements and constraints of the task.</p>
<h2 id="25-inceptionnet">2.5/ InceptionNet</h2>
<p>The Inception model, also known as GoogLeNet (after the Google Brain team that developed it), is a convolutional neural network (CNN) that was developed for the ImageNet Large Scale Visual Recognition Challenge (ILSVRC) in 2014. It was the winning model of the ILSVRC 2014 and has been widely adopted in the field of computer vision.</p>
<p>One of the key innovations of the Inception model is the use of “inception modules,” which allow the model to learn more complex features at a lower computational cost. An inception module consists of a series of parallel convolutional layers with different filter sizes, which are concatenated together and treated as a single layer. This allows the model to learn a variety of different features at different scales, and makes the model more efficient by reducing the number of parameters and the computational cost.</p>
<p>Another key characteristic of the Inception model is its use of global average pooling, which replaces the traditional fully connected (FC) layers at the end of the network. Global average pooling reduces the number of parameters in the model and makes it more robust to changes in the spatial dimensions of the input.</p>
<p>The original Inception model, Inception-v1, uses a total of nine different filter sizes in its inception modules: 1x1, 3x3, 5x5, 3x3 with 1x1 before and after, and 3x3 with 1x1 before, showed that even 1 × 1 convolutions could be beneficial by adding local nonlinearities. The 1x1 convolutional filters are used to reduce the number of channels in the input, while the larger filters (3x3, 5x5, and 3x3 with 1x1 before and after) are used to learn more complex features. It has 22 layers and is made up of a series of convolutional layers, inception modules, and global average pooling. It is a relatively shallow network, with only about 5 million parameters, and has achieved excellent results on a variety of image classification tasks and has been widely adopted in the field of computer vision. It is known for its efficiency and ability to learn complex features at a lower computational cost.</p>
<p><img src="../assets/images/CNN/inceptionmodule.PNG" width="600" /></p>
<p><strong>Figure</strong> Inception Module. <a href="https://sites.google.com/site/aidysft/objectdetection/recent-list-items">Source</a></p>
<p>The Inception model has inspired many subsequent CNN models, including the Inception-v2, Inception-v3, and Inception-v4 models, which have further improved upon the original design. They also use a variety of filter sizes in their inception modules, including 1x1, 3x3, and 5x5, as well as other sizes such as 7x7 and 1x7 and 7x1. These models also use various other techniques, such as factorization and dimensionality reduction, to improve the efficiency and performance of the inception modules.These models have achieved state-of-the-art results on a variety of image classification tasks and have been widely adopted in the field of computer vision.</p>
<p>Overall, the Inception model is a powerful tool for image classification tasks and has had a significant impact on the field of computer vision.</p>
<h1 id="conclusion">Conclusion:</h1>
<p>In conclusion, part 1 of our blog post has provided an overview of some of the most famous CNN architectures that have been developed to date. We have discussed the key features and intuition behind each architecture, including their strengths and weaknesses. We have highlighted how each architecture has contributed to the advancement of CNNs and the field of deep learning. We have also discussed how they are used in different applications and how they have evolved over time.</p>
<p>In particular, we have discussed the LeNet architecture, which was the first successful CNN architecture and laid the foundation for future developments. We have also discussed the AlexNet architecture, which won the ImageNet competition and sparked a renewed interest in CNNs. We have also discussed the VGG, GoogLeNet and ResNet architectures, which have achieved state-of-the-art results in image classification and have become widely used in many other applications.</p>
<p>As we have seen, these architectures have been able to achieve impressive results by introducing new techniques such as deeper networks, improved convolutional layers and pooling layers, and by using more advanced techniques such as residual connections, squeeze-and-excitation blocks, and dense connections.</p>
<p>In the next part of our blog post, we will discuss some of the more recent CNN architectures that have been developed and how they have pushed the boundaries of what is possible with CNNs, we will also discuss the future of CNN architectures and their potential applications.</p>Nguyễn Quốc CườngCách Google Map uớc lượng thời gian di chuyển - Ứng dụng GNN2021-09-29T00:00:00+00:002021-09-29T00:00:00+00:00https://quoccuonglqd.github.io//quoccuonguit/blogs/GoogleMap%20ETA%20with%20GNN<h1 id="1-bài-toán">1/ Bài toán:</h1>
<p>Các ứng dụng bản đồ trực tuyến là một trong những ứng dụng rất thành công của công nghệ thông tin vào đời sống. Có thể nói thành công lớn nhất chính là thu hẹp những rào cản trong việc di chuyển của con người khi cho phép chúng ta tra cứu thông tin bản đồ, định vị vị trí, hướng dẫn lộ trình và thậm chí … ước lượng giúp cả thời gian di chuyển.</p>
<p>Trong số các tiện ích kể trên, tính toán thời gian cần thiết để di chuyển là một tính năng khá đặc sắc. Bởi lẽ có rất nhiều yếu tố sẽ gây ảnh hưởng đến thời gian di chuyển, việc tổng hợp các dữ liệu này sẽ rất phức tạp. Người ta có thể đã phải thu thập thông tin về độ dài, khả năng xảy ra kẹt xe, chất lượng mặt đường, …, cập nhật liên tục sau đó tìm cách tổng hợp tất cả thông tin này - 1 quá trình không tưởng. Và đây là lúc AI, cụ thể là Machine Learning, tỏa sáng. Bài viết này sẽ tìm hiểu cách các kỹ sư DeepMind đã xây dựng tính năng ước đoán thời gian di chuyển trên Google Map - ứng dụng bản đồ nổi tiếng bậc nhất.</p>
<h1 id="2-ý-tưởng">2/ Ý tưởng:</h1>
<p>Có rất nhiều địa điểm được hiển thị trên bản đồ, với mỗi đoạn đường nối liền 2 địa điểm sẽ có rất nhiều đoạn đường cần tính toán. Ngoài ra, việc tính trực tiếp 1 đoạn đường dài cũng là 1 vấn đề khó giải quyết. Để đơn giản hóa quá trình này, giải thuật chia để trị đã được ứng dụng. Giải thuật được thực hiện bằng cách định nghĩa 1 tập các đoạn đường ngắn hơn (đoạn đường cơ sở) sao cho ta có thể biểu diễn các tuyến đường lớn hơn như 1 chuỗi liên tiếp một số tuyến ngắn này. Bài toán giờ đây có thể giải quyết thông qua ước lượng cho từng đoạn đường cơ sở và tính tổng kết quả các đoạn đường thành phần của tuyến đường quan tâm.</p>
<p><img src="../assets/images/GGMap-GNN/map.jpg" width="600" height="600" /></p>
<p><strong>Hình 1</strong> Minh họa tuyến đường từ Santa Monica Pier đến Grifith Observatory.<a href="'https://www.youtube.com/watch?v=EGPJF-tqbwE&t=15s'">Source</a></p>
<p><em>Note:</em> Trong các hình minh họa, đầu vào của mô hình được biểu diễn bằng các hình ảnh các đoạn đường cơ sở. Trên thực tế, mỗi đoạn đường cơ sở sẽ tương ứng với các thông tin về điều kiện giao thông trên live tracking và những thông tin này mới là dầu vào cho mô hình.</p>
<h4 id="a-feed-forward-network">a/ Feed Forward Network:</h4>
<p>Mô hình đơn giản nhất có thể áp dụng là dùng 1 Feed Forward Network để tính toán giá trị thời gian. Cách làm này có một nhược điểm là không xét được mối tương quan giữa các tuyến đường cơ sở. Bởi lẽ đặc điểm của mô hình này là các mẫu dữ liệu được học tách biệt với nhau.</p>
<p><img src="../assets/images/GGMap-GNN/feedforward.jpg" width="900" height="300" /></p>
<p><strong>Hình 2</strong> Feed Forward Network.<a href="'https://www.youtube.com/watch?v=EGPJF-tqbwE&t=15s'">Source</a></p>
<h4 id="b-các-kiến-trúc-hồi-quy-và-transformer">b/ Các kiến trúc hồi quy và Transformer</h4>
<p>Để khắc phục hạn chế của mạng Feed Forward, một ý tưởng dễ nghĩ đến nhất là các mô hình mạng hồi quy. Các mô hình này ban đầu được đề xuất nhằm mô hình hóa tương quan giữa các từ trong 1 câu text, về sau được mở rộng sang mối quan hệ giữa các frame trong video, các lớp cắt trong ảnh y khoa, … Ở đây, các thông tin giao thông cũng có thể đóng vai trò đầu vào cho mạng hồi quy.</p>
<p>Lý thuyết mạng hồi quy đã liên tục được cải tiến theo thời gian và đỉnh điểm là sự ra đời của mô hình Transformer - một mô hình đã thoát ra khỏi cấu trúc chung của RNN. Transformer có thể mô hình nhiều loại hình tương quan giữa toàn bộ các thành phần với cơ chế Multi-Head Attention.</p>
<p><img src="../assets/images/GGMap-GNN/transformer.png" width="1100" height="300" /></p>
<p><strong>Hình 3</strong> Transformer Encoder + Feed Forward.<a href="'https://www.youtube.com/watch?v=EGPJF-tqbwE&t=15s'">Source</a></p>
<p>Thực tế chưa có công trình nào ứng dụng Transformer cho bài toán này. Để có thể đạt độ chính xác tốt, Transformer cần phải học được quan hệ giữa tất cả các thành phần cơ sở. Mặc dù có thể chia nhỏ tập hợp các thành phần cơ sở thành các nhóm nhỏ, việc huấn luyện mô hình Transformer vẫn sẽ đòi hỏi nhiều khả năng tính toán, dữ liệu cũng như tài nguyên. Đây có thể là lý do mà Transformer vẫn không được xem là một giải pháp hứa hẹn.</p>
<h4 id="c-graph-neural-network">c/ Graph Neural Network</h4>
<p>Hạn chế về khối lượng tính toán của Transformer cơ bản là bởi mô hình này xem xét toàn bộ các liên hệ giữa các thành phần cơ sở cùng lúc. Trong bài toán ước lượng thời gian di chuyển, có một nhận xét quan trọng là các đoạn cơ sở nằm cách xa nhau thì mối liên hệ cũng yếu đi. Lợi dụng đặc tính này, người ta đã thử nghiệm một mô hình mới - Graph Neural Network (GNN).</p>
<p>GNN xây dựng đặc trưng cho các đối tượng thông qua cơ chế đồ thị bao gồm các đỉnh và cạnh. Trong bài toán này, ta có thể xem mỗi đoạn cơ sở là nút và 1 cạnh được tạo ra giữa 2 đoạn cơ sở liền kề.</p>
<p>Joshi trong <a href="https://thegradient.pub/transformers-are-graph-neural-networks/">bài viết</a> của mình đã trình bày quan điểm Transformer thực chất có thể xem như một trường hợp đặc biệt của GNN. Transformer có thể xem như mô hình GNN với một đồ thị đầy đủ.</p>
<p><img src="../assets/images/GGMap-GNN/map_representation.jpg" width="800" height="550" /></p>
<p><strong>Hình 4</strong> Biểu diễn liên hệ giữa các thành phần cơ sở dưới dạng đồ thị.<a href="'https://www.youtube.com/watch?v=EGPJF-tqbwE&t=15s'">Source</a></p>
<p>Sau khi huấn luyện mô hình GNN, ta thu được đặc trưng biểu diễn cho từng đoạn đường. Đặc trưng này sau đó có thể sử dụng làm đầu vào cho mạng Feed Forward Network để dự đoán thời gian di chuyển.</p>
<p><img src="../assets/images/GGMap-GNN/gnn+feedforward.jpg" width="800" height="550" /></p>
<p><strong>Hình 5</strong> Tổng quan ý tưởng sử dụng GNN + Feed Forward Net.<a href="'https://www.youtube.com/watch?v=EGPJF-tqbwE&t=15s'">Source</a></p>
<h1 id="tham-khảo">Tham khảo</h1>
<ul>
<li>CodeEmporium. (2021, May 17). Breaking down Google Maps with Neural Networks! [Video]. YouTube. https://www.youtube.com/watch?v=EGPJF-tqbwE&t=150s</li>
<li>Microsoft Research. (2020, May 9). An Introduction to Graph Neural Networks: Models and Applications [Video]. YouTube. https://www.youtube.com/watch?v=zCEYiCxrL_0)</li>
<li>Chaitanya K. Joshi, “Transformers are Graph Neural Networks”, The Gradient, 2020.</li>
<li>O.L.L.P. (2020, September 3). Traffic prediction with advanced Graph Neural Networks. Blog. https://deepmind.com/blog/article/traffic-prediction-with-advanced-graph-neural-networks</li>
</ul>Nguyễn Quốc CườngTìm hiểu về neural rendering và mô hình NERF2021-07-09T00:00:00+00:002021-07-09T00:00:00+00:00https://quoccuonglqd.github.io//quoccuonguit/blogs/L%C3%BD%20thuy%E1%BA%BFt%20NERF<h1 id="1-giới-thiệu-chung">1/ Giới thiệu chung:</h1>
<p>Với rất nhiều ứng dụng trong các lĩnh vực, ngành đồ họa máy tính luôn được quan tâm và phát triển không ngừng. Trong nỗ lực cải thiện các vấn đề còn tồn tại của quy trình đồ họa truyền thống, machine learning đã được đưa vào nghiên cứu như một giải pháp tiềm năng. Sự kết hợp giữa đồ họa máy tính và machine learning đã cho ra đời một hướng nghiên cứu vô cùng hấp dẫn - neural rendering.</p>
<p>Trong bài viết này, chúng ta sẽ tìm hiểu về những khái niệm cơ bản của neural rendering và một mô hình neural rendering tiêu biểu của bài toán novel view synthesis - NERF.</p>
<p><em>Các bạn có thể xem qua bài viết hướng dẫn chạy NERF tại <a href="http://quoccuonglqd.github.io/quoccuonguit/blogs/Guideline%20NERF">đây</a></em></p>
<h1 id="2-bối-cảnh-nghiên-cứu">2/ Bối cảnh nghiên cứu:</h1>
<h2 id="21-neural-rendering-là-gì">2.1. Neural rendering là gì?</h2>
<p>Quy trình đồ họa truyền thống liên quan đến những tác vụ thiết kế, căn chỉnh thủ công đối với các mô hình. Những công việc này đòi hỏi rất nhiều thời gian và công sức để hoàn thành. Tuy nhiên đây vẫn luôn là lựa chọn tối ưu của người làm đồ họa. Bởi lẽ với quy trình này, desiner có thể kiểm soát hoàn toàn các yếu tố của một mô hình, từ ánh sáng, vị trí camera, bề mặt cho đến texture, hiệu ứng đổ bóng, v.v. Và hiển nhiên là chất lượng của mô hình thiết kế sẽ tỉ lệ thuận với năng lực của desiner. Sản phẩm của 1 designer chuyên nghiệp sẽ có chất lượng rất cao.</p>
<p>Để giảm thiểu công sức thiết kế của designer, các hướng tiếp cận dựa trên machine learning đã được đưa vào nghiên cứu. Trước hết phải kể đến những nghiên cứu về mạng GAN. Những mô hình GAN sẽ cho phép máy tính tạo ra hình ảnh đầu ra từ việc huấn luyện trên dữ liệu cho trước. Nhưng bù lại cho ưu điểm trên, mô hình GAN được chứng minh là chưa đủ hiệu quả để mô tả những yếu tố chi tiết của mô hình như hiệu ứng đổ bóng, motion, v.v.</p>
<table>
<thead>
<tr>
<th>Traditional Computer Graphic</th>
<th>Generative Model</th>
</tr>
</thead>
<tbody>
<tr>
<td>Ưu điểm:</td>
<td>Ưu điểm:</td>
</tr>
<tr>
<td>- Chất lượng đầu ra cao</td>
<td>- Hoàn toàn tự động</td>
</tr>
<tr>
<td> </td>
<td>- Thời gian render nhanh</td>
</tr>
<tr>
<td>Khuyết điểm:</td>
</tr>
<tr>
<td>- Tốn nhiều công sức</td>
<td>- Đòi hỏi nhiều dữ liệu huấn luyện</td>
</tr>
<tr>
<td>- Thời gian render lâu</td>
<td>- Không mô phỏng được các yếu tố chi tiết</td>
</tr>
</tbody>
</table>
<p>Neural rendering là một hướng tiếp cận kết hợp điểm mạnh của 2 người tiền bối. Các mô hình ML giờ đây sẽ được “trang bị” thêm những thành phần để thể hiện các tính chất vật lý từ đồ họa.</p>
<h2 id="22-bài-toán-novel-view-synthesis">2.2. Bài toán Novel View Synthesis:</h2>
<p>Đây là bài toán dự đoán hình ảnh từ các góc nhìn bất kỳ bằng cách cung cấp hình ảnh từ một số góc độ làm dữ liệu huấn luyện.
<img src="../assets/images/Xây dựng mô hình 3D với NERF/Novel view synthesis.png" width="600" /></p>
<p><strong>Hình 1</strong> Novel View Synthesis. <a href="https://justusthies.github.io/posts/neuralrenderingtutorial_cvpr/">Source</a></p>
<h2 id="23-các-kỹ-thuật-render">2.3. Các kỹ thuật render:</h2>
<p>Rendering hay chính là quá trình chuyển đổi các thông số của mô hình đồ họa thành hình ảnh. Nhìn chung, các kỹ thuật render có thể phân thành 2 nhóm chính.</p>
<ul>
<li>Rasterization: Thông số của mô hình đồ họa được biểu diễn bởi một tập đối tượng trung gian. Có thể kể đến một số loại đối tượng trung gian sẽ là các tam giác, đa giác, mesh hay voxel. Mỗi một đối tượng trung gian sẽ ảnh hưởng đến giá trị của một số pixel trong hình ảnh render.</li>
<li>Ray tracing: Mô hình hóa quá trình truyền của các tia sáng. Đơn vị nhỏ nhất được xem xét là các hạt vật lý trong môi trường</li>
</ul>
<p>NERF là một mô hình neural rendering kết hợp kỹ thuật ray tracing với mô hình ML để giải quyết bài toán Novel View Synthesis.</p>
<p><img src="../assets/images/Xây dựng mô hình 3D với NERF/Nerf.png" width="600" /></p>
<p><strong>Hình 2</strong> Bối cảnh nghiên cứu NERF.</p>
<h1 id="3-nội-dung-lý-thuyết">3/ Nội dung lý thuyết:</h1>
<h2 id="31-ray-tracing-volume-rendering">3.1. Ray-tracing volume rendering:</h2>
<p>Từ <em>volume</em> mang ý nghĩa rằng thể tích không gian được mô phỏng sẽ được giới hạn trở lại. Các hiện tượng hấp thụ, phản xạ tia sáng sẽ chỉ được xem xét trên các hạt vật lý thuộc vùng không gian quy định</p>
<p><img src="../assets/images/Xây dựng mô hình 3D với NERF/volume rendering.jpg" width="600" /></p>
<p><strong>Hình 3</strong> Mô phỏng quá trình tia sáng truyền đi. <a href="htttps://slidetodoc.comfast-high-accuracy-volume-rendering-thesis-defense-may">Source</a></p>
<p>Trong mô hình mô phỏng, giả định rằng các hạt vật lý lấp đầy trong không gian và không bị chồng lấp. Trên 1 tiết diện có diện tích đáy là <img src="https://render.githubusercontent.com/render/math?math=\Large E" />, chiều cao <img src="https://render.githubusercontent.com/render/math?math=\Large \delta s" />, có <img src="https://render.githubusercontent.com/render/math?math=\Large m(x)" /> các hạt vật lý hình cầu có bán kính <img src="https://render.githubusercontent.com/render/math?math=\Large r" /> bằng nhau. Khi tia sáng chiếu tới vị trí tiết diện sẽ có 2 khả năng:</p>
<ul>
<li>Tia sáng bị chặn lại bởi các hạt</li>
<li>Tia sáng đi qua được kẽ hở giữa các hạt.</li>
</ul>
<p>Vậy tại vị trí của tiết diện, có 2 loại nguồn sáng khác nhau:</p>
<ul>
<li>Nguồn sáng từ background đi xuyên qua</li>
<li>Nguồn sáng phản xạ của bản thân các hạt tại vị trí này</li>
</ul>
<p>Tại 1 vị trí <img src="https://render.githubusercontent.com/render/math?math=\Large x_0" /> , cường độ ánh sáng được bổ sung bởi nguồn sáng phản xạ tại đây <br />
<img src="https://latex.codecogs.com/svg.latex?\Large&space;\lim_{x-x_0\to0}\frac{I(x)-I(x_0)}{x-x_0}=c(x_0)\frac{m(x_0)r^{2}\pi}{E}=c(x_0)\sigma(x_0)" alt="\Large" /> (1)</p>
<p>Trong đó <img src="https://render.githubusercontent.com/render/math?math=\Large c(x_0)" /> là giá trị cường độ ánh sáng của các hạt tại vị trí <img src="https://render.githubusercontent.com/render/math?math=\Large x_0" />, <img src="https://render.githubusercontent.com/render/math?math=\Large \sigma(x_0)" /> là xác suất ánh sáng bắt nguồn từ các hạt ở vị trí này thay vì là ánh sáng từ background.</p>
<p>Đồng thời, nguồn sáng background <img src="https://render.githubusercontent.com/render/math?math=\Large I_0" /> bị hấp thụ bởi các hạt:</p>
<p><img src="https://latex.codecogs.com/svg.latex?\Large&space;\lim_{x-x_0\to0}\frac{I(x)-I(x_0)}{x-x_0}=-I_{0}\sigma(x_0)" alt="\Large" /> (2)</p>
<p>Tổng hợp 2 công thức ở trên, ta thu được:</p>
<p><img src="https://latex.codecogs.com/svg.latex?\Large&space;\lim_{x-x_0\to0}\frac{I(x)-I(x_0)}{x-x_0}=c(x_0)\sigma(x_0)-I_{0}\sigma(x_0)" alt="\Large" /> (3)</p>
<p>Giải phương trình vi phân này sẽ được:</p>
<p><img src="https://latex.codecogs.com/svg.latex?\Large&space;I(s)=\int_{0}^{s}c(x)\sigma(x)T(x)\,dx+I_{0}T(0)" alt="\Large" /> (4)</p>
<p><img src="https://latex.codecogs.com/svg.latex?\Large&space;T(x)=exp(-\int_{x}^{s}\sigma(t)\,dt)" alt="\Large" /> (5)</p>
<p>Bởi vì không xét đến nguồn sáng của background, nên ta có giá trị <img src="https://render.githubusercontent.com/render/math?math=\Large I_0=0" />:</p>
<p><img src="https://latex.codecogs.com/svg.latex?\Large&space;I(s)=\int_{0}^{s}c(x)\sigma(x)T(x)\,dx" alt="\Large" /> (6)</p>
<p>Theo lý thuyết volume rendering, để tính giá trị màu từ cường độ ánh sáng, ta thay <img src="https://render.githubusercontent.com/render/math?math=\Large \sigma(x)" /> bằng <img src="https://render.githubusercontent.com/render/math?math=\Large 1-exp(-\sigma(x))" /></p>
<p><img src="https://latex.codecogs.com/svg.latex?\Large&space;i(s)=\int_{0}^{s}c(x)(1-exp(-\sigma(x)))T(x)\,dx" alt="\Large" /> (7)</p>
<h2 id="32-lượng-tử-hóa">3.2. Lượng tử hóa:</h2>
<p>Để tính hàm tích phân ở trên, phương pháp lượng tử hóa được sử dụng thông qua việc sample một số lượng hữu hạn các điểm trong vùng không gian được giới hạn.</p>
<p>Giả sử tia sáng đi qua vùng không gian cắt tại 1 đoạn thẳng <img src="https://render.githubusercontent.com/render/math?math=\Large AB" />. Ta chia thành N đoạn bằng nhau; trên mỗi đoạn sample 1 điểm ở vị trí bất kỳ. Hàm tích phân ở vế phải phương trình (7) được ước lượng bởi:</p>
<p><img src="https://latex.codecogs.com/svg.latex?\Large&space;i(s)=\sum_{j=1}^{N}c(j)(1-exp(-\sigma(j)\delta(j)))T(j)\,dx" alt="\Large" /> (8)</p>
<p><img src="https://latex.codecogs.com/svg.latex?\Large&space;T(j)=exp(-\sum_{k=1}^{j-1}\sigma(j)\delta(j))" alt="\Large" /> (9)</p>
<p><img src="https://latex.codecogs.com/svg.latex?\Large&space;\delta(j)=t_{j+1}-t_j" alt="\Large" /> (10)<br />
là khoảng cách giữa 2 điểm liên tiếp</p>
<h2 id="33-mô-hình-nerf">3.3. Mô hình NERF:</h2>
<p>Đến đây, ý tưởng chính của NERF là sử dụng một mạng MLP để tính các giá trị <img src="https://render.githubusercontent.com/render/math?math=\Large c" /> và <img src="https://render.githubusercontent.com/render/math?math=\Large \sigma" /> ở trên. Input của mạng là 1 vector 5 chiều thể hiện vị trí và góc độ của một điểm sample. Mạng MLP sẽ ánh xạ input trên thành giá trị <img src="https://render.githubusercontent.com/render/math?math=\Large c" /> và <img src="https://render.githubusercontent.com/render/math?math=\Large \sigma" /> tương ứng. Những cặp output sẽ được tổng hợp theo công thức (8) để tính toán giá trị pixel được dự đoán tương ứng</p>
<p><img src="../assets/images/Xây dựng mô hình 3D với NERF/mlp.jpg" width="600" /></p>
<p><strong>Hình 4</strong> Mạng MLP ánh xạ input vị trí và góc độ sang <img src="https://render.githubusercontent.com/render/math?math=\Large c" /> và <img src="https://render.githubusercontent.com/render/math?math=\Large \sigma" />. <a href="https://i.ytimg.com/vi/dPWLybp4LL0/maxresdefault.jpg">Source</a></p>
<p>Quá trình training được thực hiện thông qua thuật toán backpropagation. Hàm loss được tính toán thông qua giá trị dự đoán pixel và giá trị ground truth của pixel đó trong dataset.</p>
<p>Kích cỡ của dataset sẽ tương đương với số lượng pixel trong dataset. Số lần forward mạng MLP trong 1 epoch train sẽ bằng kích cỡ dataset nhân với N. Trong đó N là số lượng điểm sample trên 1 tia tương ứng 1 pixel. Giá trị N càng lớn, thời gian huấn luyện mô hình sẽ càng lâu, nhưng độ chính xác và chi tiết của hình ảnh cũng sẽ tăng tương ứng.</p>
<p><strong><em>Lời kết:</em></strong> Trong bài viết này, chúng ta đã cùng tìm hiểu về lý thuyết volume ray-tracing rendering cũng như mô hình neural rendering NERF. Hẹn gặp các bạn trong các bài viết sau.</p>
<h1 id="tham-khảo">Tham khảo</h1>
<ul>
<li>Mildenhall, B., Srinivasan, P. P., Ortiz-Cayon, R., Kalantari, N. K., Ramamoorthi, R., Ng, R., & Kar, A. (2019). Local light field fusion: Practical view synthesis with prescriptive sampling guidelines. ACM Transactions on Graphics (TOG), 38(4), 1-14.</li>
<li>Mildenhall, B., Srinivasan, P. P., Tancik, M., Barron, J. T., Ramamoorthi, R., & Ng, R. (2020, August). Nerf: Representing scenes as neural radiance fields for view synthesis. In European conference on computer vision (pp. 405-421). Springer, Cham.</li>
<li>Kajiya, J. T., & Von Herzen, B. P. (1984). Ray tracing volume densities. ACM SIGGRAPH computer graphics, 18(3), 165-174.</li>
</ul>Nguyễn Quốc CườngGuideline huấn luyện mô hình NERF2021-07-04T00:00:00+00:002021-07-04T00:00:00+00:00https://quoccuonglqd.github.io//quoccuonguit/blogs/Guideline-NERF<h1 id="1-giới-thiệu">1/ Giới thiệu</h1>
<p>Ngày nay công nghệ 3D đang được ứng dụng trong rất nhiều lĩnh vực, từ giáo dục, y tế, thiết kế xây dựng hay có thể kể đến lĩnh vực rất được giới trẻ ưa thích- ngành công nghiệp game. Quy trình truyền thống để xây dựng nên các mô hình 3D vốn yêu cầu làm việc trên các phần mềm đồ họa chuyên dụng với các thao tác không thể thiếu từ việc lấy tọa độ các đỉnh vật thể, tô màu, căn chỉnh vị trí, v.v.</p>
<p>Chắc hẳn trong số chúng ta đều từng tưởng tượng đến một quy trình làm việc ít phức tạp hơn, tiện lợi hơn. Ví dụ bạn có thể chụp những bức ảnh 2D của vật thể và để máy tính làm nốt những công việc còn lại để thu được mô hình 3D tương ứng. Và các nghiên cứu trong lĩnh vực <strong>View synthesis and image-based rendering</strong> đã thực sự biến ý tưởng này thành hiện thực.</p>
<p><img src="../assets/images/Xây dựng mô hình 3D với NERF/pecanpie_200k_rgb.gif" width="200" height="200" />
<img src="../assets/images/Xây dựng mô hình 3D với NERF/benchflower_100k_rgb.gif" width="200" height="200" />
<img src="../assets/images/Xây dựng mô hình 3D với NERF/colorspout_200k_rgb.gif" width="200" height="200" /></p>
<p>Bài viết này sẽ hướng dẫn các bạn sử dụng mô hình NERF để mô hình 3D hóa một tập hình ảnh cảnh vật bất kỳ. NERF cho phép chúng ta render hình của cảnh vật từ 1 góc độ mới chưa từng xuất hiện trong dữ liệu ảnh ban đầu. Bằng cách render từ các vị trí liên tiếp nhau, chúng ta có thể thu được khung cảnh động của cảnh vật như trên. Rất thú vị đúng không nào ?!!</p>
<p><em>Các bạn có thể xem qua bài viết giới thiệu ý tưởng NERF tại <a href="http://quoccuonglqd.github.io/quoccuonguit/blogs/Lý%20thuyết%20NERF">đây</a></em></p>
<h1 id="2-chuẩn-bị-dữ-liệu">2/ Chuẩn bị dữ liệu</h1>
<p><a href="https://colab.research.google.com/drive/1Q0V_uxwFs3wCiF6DU_cyG8FEidcF3lWr?usp=sharing"><img src="https://colab.research.google.com/assets/colab-badge.svg" alt="Open NERF-data-preparation in Colab" /></a></p>
<p>Để sử dụng được mô hình NERF, các hình ảnh đầu vào cần phải đi kèm với các thông số 3D. Các thông số bao gồm vị trí camera, tiêu cự,v.v tương ứng với mỗi bức ảnh. Mô hình NERF sau đó sẽ học cách ánh xạ các thông số 3D này thành các giá trị màu.</p>
<p>Chúng ta sẽ thử nghiệm với 2 cách tạo hình ảnh đầu vào. Đó là hình ảnh synthetic và hình ảnh thực.</p>
<h2 id="dữ-liệu-synthetic-dữ-liệu-nhân-tạo">Dữ liệu synthetic (dữ liệu nhân tạo)</h2>
<p>Đây là loại hình ảnh thu được từ việc render một mô hình đồ họa hoặc từ một quy trình sinh ảnh nào đó. Loại dữ liệu này thường sẽ dễ dàng để kiểm soát các thông số 3D của mỗi hình ảnh. Trong bài viết sẽ sử dụng hình ảnh render từ mô hình blender.</p>
<p><em>Note: Việc sử dụng NERF với tập dữ liệu synthetic có vẻ không có ý nghĩa. Bởi vì khi có trong tay mô hình 3D (ví dụ mô hình blender), ta hoàn toàn có thể thu được hình ảnh từ góc độ bất kỳ. Tuy nhiên, NERF sẽ cho phép ta lưu trữ mô hình dưới một dạng mới thay vì 1 file blender, mesh, voxel, v.v</em></p>
<p><strong>Bước 1: Chuẩn bị file blender</strong></p>
<ul>
<li>Thiết kế hoặc download 1 mô hình</li>
<li>Kéo thả sao cho tâm vật thể nằm ở điểm \((0,0,0)\)</li>
<li>Chọn vị trí camera bắt được hình ảnh như mong muốn</li>
</ul>
<p><strong>Bước 2: Tạo dữ liệu từ file blender</strong></p>
<ul>
<li>Clone code
<div class="language-bash highlighter-rouge"><div class="highlight"><pre class="highlight"><code>git clone https://github.com/quoccuonglqd/NERF-Pipeline
<span class="nb">cd </span>NERF-Pipeline
</code></pre></div> </div>
</li>
<li>Chỉnh sửa các thông số cần thiết trong file 360_view.py
<ul>
<li>Chỉnh dòng 9 (<code class="language-plaintext highlighter-rouge">VIEWS</code>) để chọn số hình ảnh render</li>
<li>Chỉnh dòng 20 (<code class="language-plaintext highlighter-rouge">fp</code>) để chọn folder lưu hình ảnh, gọi là \(folder\_dir\)</li>
<li>Chỉnh dòng 15 (<code class="language-plaintext highlighter-rouge">RANDOM_VIEWS</code>) thành False nếu không muốn hình ảnh render ở các góc bất kỳ</li>
<li>Chỉnh dòng 16 (<code class="language-plaintext highlighter-rouge">UPPER_VIEWS</code>) (chỉ có tác dụng khi dòng 15 là True) để quy định render ở chỉ 1 phía của mô hình</li>
</ul>
</li>
<li>Cài đặt <strong>Blender_api</strong>
<div class="language-bash highlighter-rouge"><div class="highlight"><pre class="highlight"><code><span class="nb">chmod </span>777 download_blender_api.sh
./download_blender_api.sh
</code></pre></div> </div>
</li>
<li>Render hình ảnh
Chạy lệnh sau đây với đường dẫn đến file .blend đã chuẩn bị
<div class="language-bash highlighter-rouge"><div class="highlight"><pre class="highlight"><code><span class="nb">sudo</span> ./blender-2.91.0-linux64/blender <span class="nt">-b</span> <your-blender-file> <span class="nt">-noaudio</span> <span class="nt">-P</span> <span class="s1">'./GPU.py'</span> <span class="nt">-P</span> <span class="s1">'./360_view.py'</span> <span class="nt">-E</span> <span class="s1">'CYCLES'</span> <span class="nt">-o</span> // <span class="nt">-f</span> 1 <span class="nt">-F</span> <span class="s1">'PNG'</span>
</code></pre></div> </div>
</li>
<li>Chia tập <code class="language-plaintext highlighter-rouge">train</code>, <code class="language-plaintext highlighter-rouge">val</code>, <code class="language-plaintext highlighter-rouge">test</code>
<div class="language-bash highlighter-rouge"><div class="highlight"><pre class="highlight"><code><span class="nb">mkdir</span> <folder_dir>/train
<span class="nb">mkdir</span> <folder_dir>/val
<span class="nb">mkdir</span> <folder_dir>/test
python data_split.py <span class="nt">--folder_dir</span> <folder_dir>
</code></pre></div> </div>
</li>
</ul>
<h2 id="dữ-liệu-ảnh-thực">Dữ liệu ảnh thực</h2>
<p>Đây là hình ảnh chụp được trong thế giới thực, thường là từ camera máy ảnh, smartphone, v.v. Thông thường, dữ liệu dạng này không có các thông số 3D tương ứng. Để giải quyết vấn đề này, ta có thể sử dụng COLMAP, một project cho phép ước lượng chính xác các thông số 3D từ tập hình ảnh.</p>
<p><strong>Bước 1: Chụp ảnh</strong></p>
<ul>
<li>Tạo một folder chứa dữ liệu, gọi là <code class="language-plaintext highlighter-rouge">scene_dir</code></li>
<li>Tạo thư mục con trong <code class="language-plaintext highlighter-rouge">scene_dir</code>, đặt tên là <code class="language-plaintext highlighter-rouge">scene_dir/images</code></li>
<li>Lưu hình ảnh chụp được trong folder <code class="language-plaintext highlighter-rouge">images</code> ở trên</li>
</ul>
<p><strong>Bước 2: Tạo dữ liệu</strong></p>
<ul>
<li>Clone code
<div class="language-bash highlighter-rouge"><div class="highlight"><pre class="highlight"><code>git clone https://github.com/quoccuonglqd/NERF-Pipeline
<span class="nb">cd </span>NERF-Pipeline
</code></pre></div> </div>
</li>
<li>Cài đặt <strong>COLMAP</strong>
<div class="language-bash highlighter-rouge"><div class="highlight"><pre class="highlight"><code><span class="nb">chmod </span>777 install_colmap.sh
./install_colmap.sh
</code></pre></div> </div>
</li>
<li>Thay đường dẫn đến <code class="language-plaintext highlighter-rouge">scene_dir</code>
<div class="language-bash highlighter-rouge"><div class="highlight"><pre class="highlight"><code>python imgs2poses.py <scene_dir>
</code></pre></div> </div>
</li>
</ul>
<h1 id="3-train-nerf-với-dataset-đã-tạo">3/ Train NERF với dataset đã tạo</h1>
<p>Sau khi đã có data hợp lệ, ta đã có thể huấn luyện mô hình NERF để học cách render ảnh ở các vị trí mới.
Trước tiên chúng ta clone source code NERF từ github</p>
<div class="language-bash highlighter-rouge"><div class="highlight"><pre class="highlight"><code>git clone https://github.com/bmild/nerf
<span class="nb">cd </span>nerf
</code></pre></div></div>
<p>Kế tiếp là cài đặt các package cần thiết. Bước này yêu cầu Anaconda đã được cài đặt sẵn.</p>
<div class="language-bash highlighter-rouge"><div class="highlight"><pre class="highlight"><code>conda <span class="nb">env </span>create <span class="nt">-f</span> environment.yml
conda activate nerf
</code></pre></div></div>
<p>Tạo một file config.txt trong đường dẫn hiện tại. Tại đây ta có thể điều chỉnh các thiết lập về loại data(synthetic hoặc real), đường dẫn và các thông số khác. Nếu đây là lần đầu thử nghiệm, bạn có thể dựa trên 2 file có sẵn config_lego.txt và config_fern.txt</p>
<ul>
<li>Sửa dòng thứ 1 <code class="language-plaintext highlighter-rouge">expname</code> thành tên dataset</li>
<li>Sửa dòng thứ 2 <code class="language-plaintext highlighter-rouge">basedir</code> thành đường dẫn đến thư mục sẽ chứa output</li>
<li>Sửa dòng thứ 3 <code class="language-plaintext highlighter-rouge">datadir</code> thành đường dẫn đến thư mục data đã tạo ở phần 2</li>
<li>Sửa dòng thứ 4 <code class="language-plaintext highlighter-rouge">dataset_type</code> để lựa chọn loại data</li>
</ul>
<p>Bắt đầu train, quá trình này sẽ tốn nhiều thời gian. Tốc độ hội tụ tùy thuộc vào loại dữ liệu, kích cỡ hình ảnh, v.v</p>
<div class="language-bash highlighter-rouge"><div class="highlight"><pre class="highlight"><code>python run_nerf.py <span class="nt">--config</span> config.txt
</code></pre></div></div>
<p>Hình ảnh, video minh họa cũng như trọng số mô hình sẽ thu được trong thư mục chứa output ở trên</p>
<p><img src="../assets/images/Xây dựng mô hình 3D với NERF/mclaren.gif" width="150" height="150" />
<img src="../assets/images/Xây dựng mô hình 3D với NERF/motobike.gif" width="150" height="150" />
<img src="../assets/images/Xây dựng mô hình 3D với NERF/sunnygo.gif" width="150" height="150" />
<img src="../assets/images/Xây dựng mô hình 3D với NERF/vikoda.gif" width="150" height="150" /></p>
<p><strong><em>Lời kết</em></strong>: Vậy là chúng ta đã hoàn thành lần thử nghiệm đầu tiên. Bằng dữ liệu ảnh, ta đã thu được video tương ứng. Trọng số của mô hình NERF cũng được lưu lại và có thể sử dụng để lưu trữ một mô hình 3D thay cho các cách biểu diễn cũ. Mô hình NERF đã được cải tiến trong thơi gian gần đây; source code chính thức cũng đã hỗ trợ thêm nhiều tính năng thú vị thay vì chỉ tạo ra video đổi góc. Những điều này đang chờ chúng ta khám phá.</p>Nguyễn Quốc Cường